By Colin Newcomer
Published January 29, 2026

Once you’ve set up your WordPress website, the next step is to actually get your website in front of people, whether those people are potential customers, existing customers, fans, or anyone else who might be interested in what you offer.
One of the most common ways to attract an audience is from search engines like Google and Bing. However, if you want to get the most traffic (and the most qualified traffic), you’ll need to put a little effort into search engine optimization (SEO).
In this part of our getting started with WordPress series, we’re going to cover the fundamentals of WordPress SEO.
This is not every single thing you need to know about SEO, as that would require writing an entire book. Instead, we’re just going to cover the basics that every WordPress webmaster needs to know, along with how to implement those basics on your site.
To make this post as useful as possible, we’re going to break these SEO basics into two categories:
- Site-level optimizations – Basic WordPress SEO tasks that apply to your entire site, such as installing an SEO plugin, setting permalinks, etc.
- Content-level optimizations – SEO tasks that you should perform for each individual piece of content that you want to rank in Google.
Let’s get into it…
How to optimize your WordPress site for search engines
In this first section, we’ll cover three basic WordPress SEO best practices that you can handle at the site level:
- Install and configure a WordPress SEO plugin.
- Select an optimized permalink structure.
- Submit your WordPress site to Google Search Console (and Bing Webmaster Tools).
Install and configure a WordPress SEO plugin
The core WordPress software doesn’t come with built-in functionality for most SEO tasks, so you’ll need to install a WordPress SEO plugin to access important functionality.
Because pretty much every single WordPress site needs an SEO plugin, there are a number of quality options out there, including Yoast SEO, The SEO Framework, Rank Math, All In One SEO, SEOPress, and others.
While all of these are solid options, most WordPress webmasters will be fine with the free version of Yoast SEO. It’s the most popular SEO plugin, widely supported, and has a long track record of reliability.
For that reason, we’re going to use the free version of Yoast SEO for all the screenshots and examples in this post. However, the same basic tasks that we’ll cover will apply to any SEO plugin.
You can install Yoast SEO just like any other free plugin that’s listed at WordPress.org:
- Go to Plugins → Add New in your WordPress dashboard.
- Search for “Yoast SEO”.
- Click the Install Now button for Yoast SEO – make sure it’s the main Yoast SEO plugin, as searching for “Yoast SEO” will also turn up third-party extension plugins for the core Yoast SEO plugin.
- Once the installation process finishes, click Activate to enable the plugin on your site.
If you need some help, check out our guide to choosing and installing WordPress plugins.
When you first activate the plugin, it will launch a short setup wizard to help you configure some important basics. For more information about all of the settings in the plugin, you can read the Yoast SEO configuration guide.
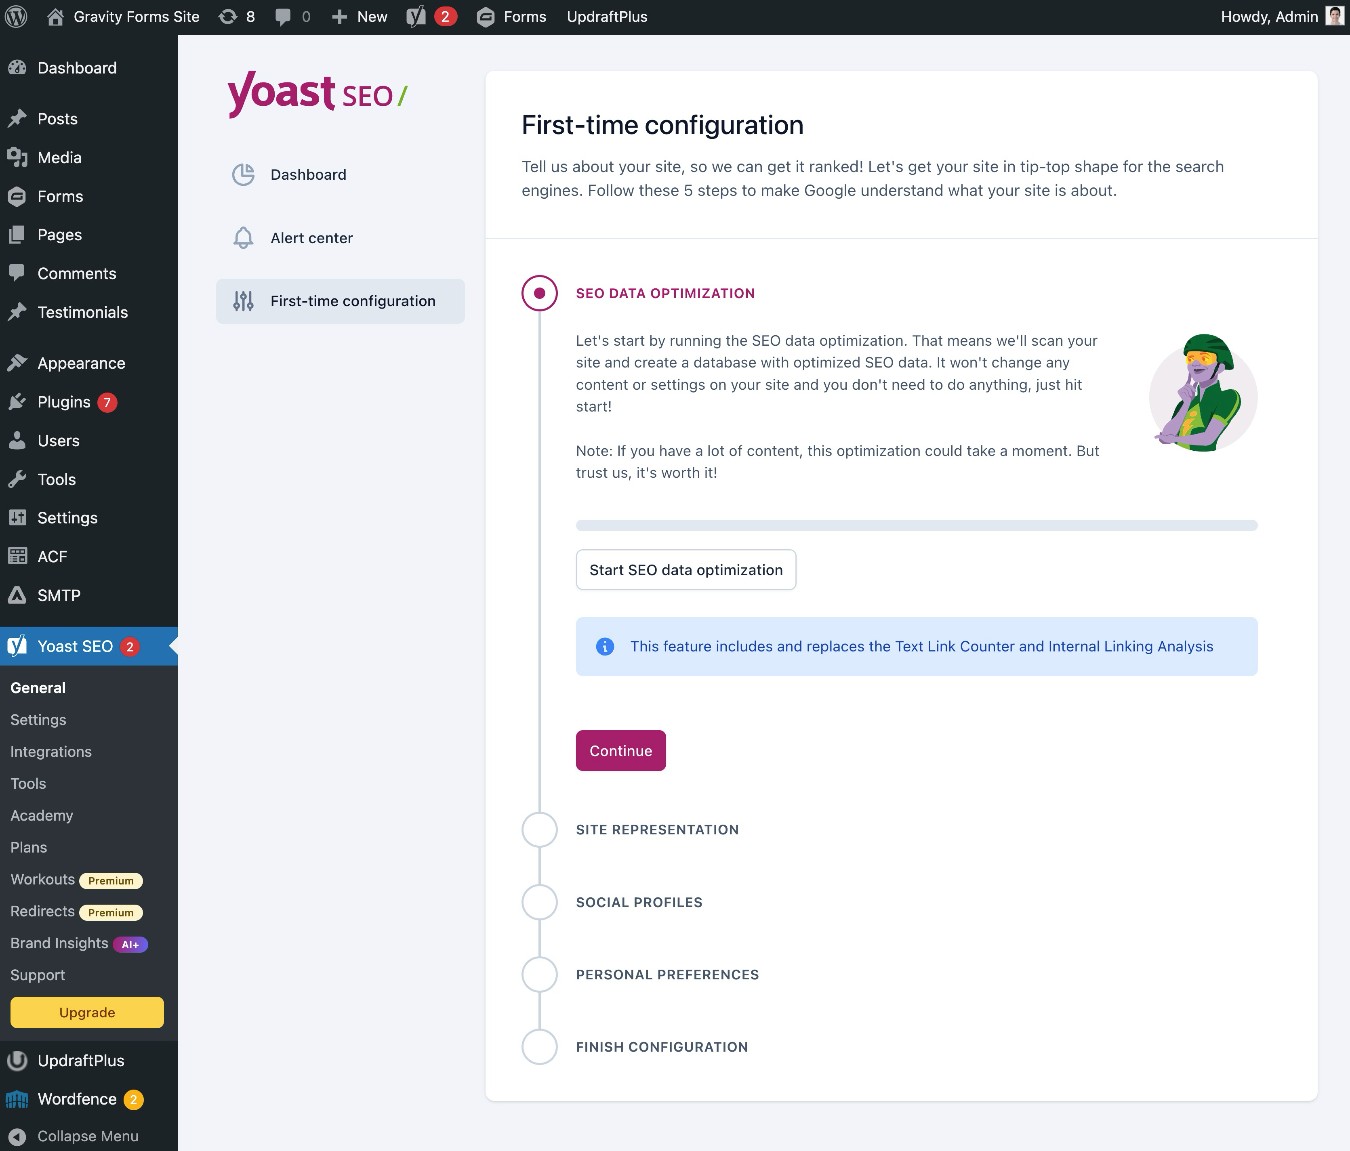
You can also launch the configuration at a later time by going to Yoast SEO → General → First-time configuration.
We’ll cover some more Yoast SEO features later in this post when we show you how to optimize individual pieces of content.
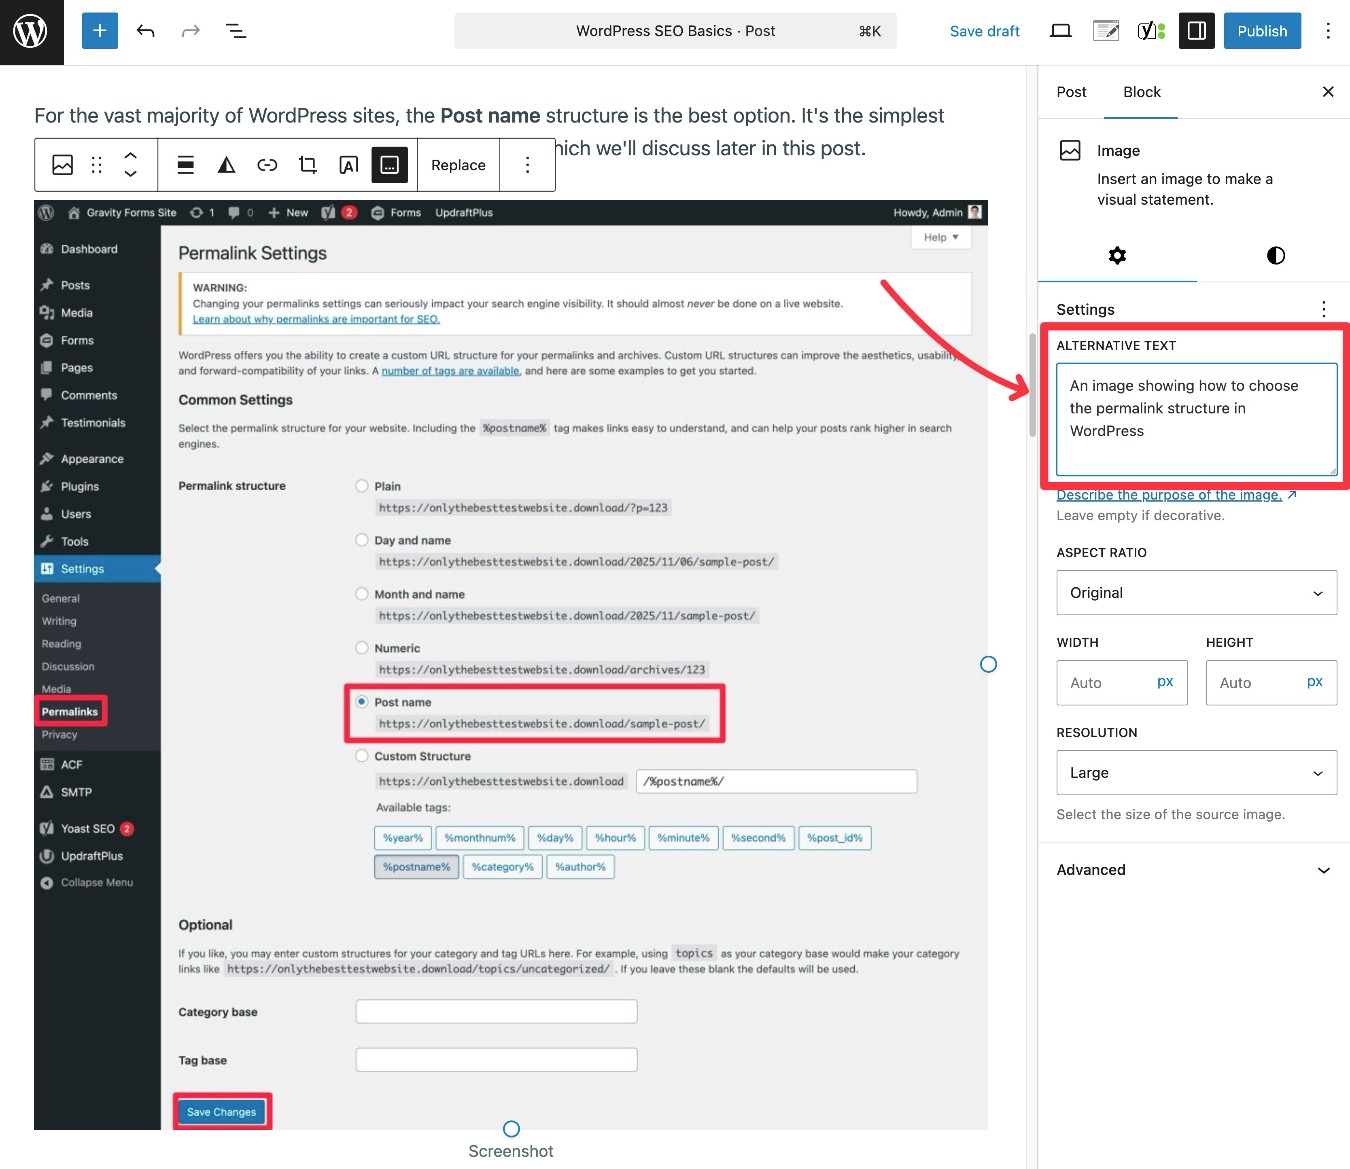
Select an optimized permalink structure
Your site’s permalink settings control the structure of URLs on your site.
For example, your permalink settings are the difference between a blog post being located at yoursite.com/wordpress-seo-basics and yoursite.com/10/2025/wordpress-seo-basics.
Because the URL of each piece of content plays a role in SEO, you’ll want to make sure that you’re choosing the right permalink structure.
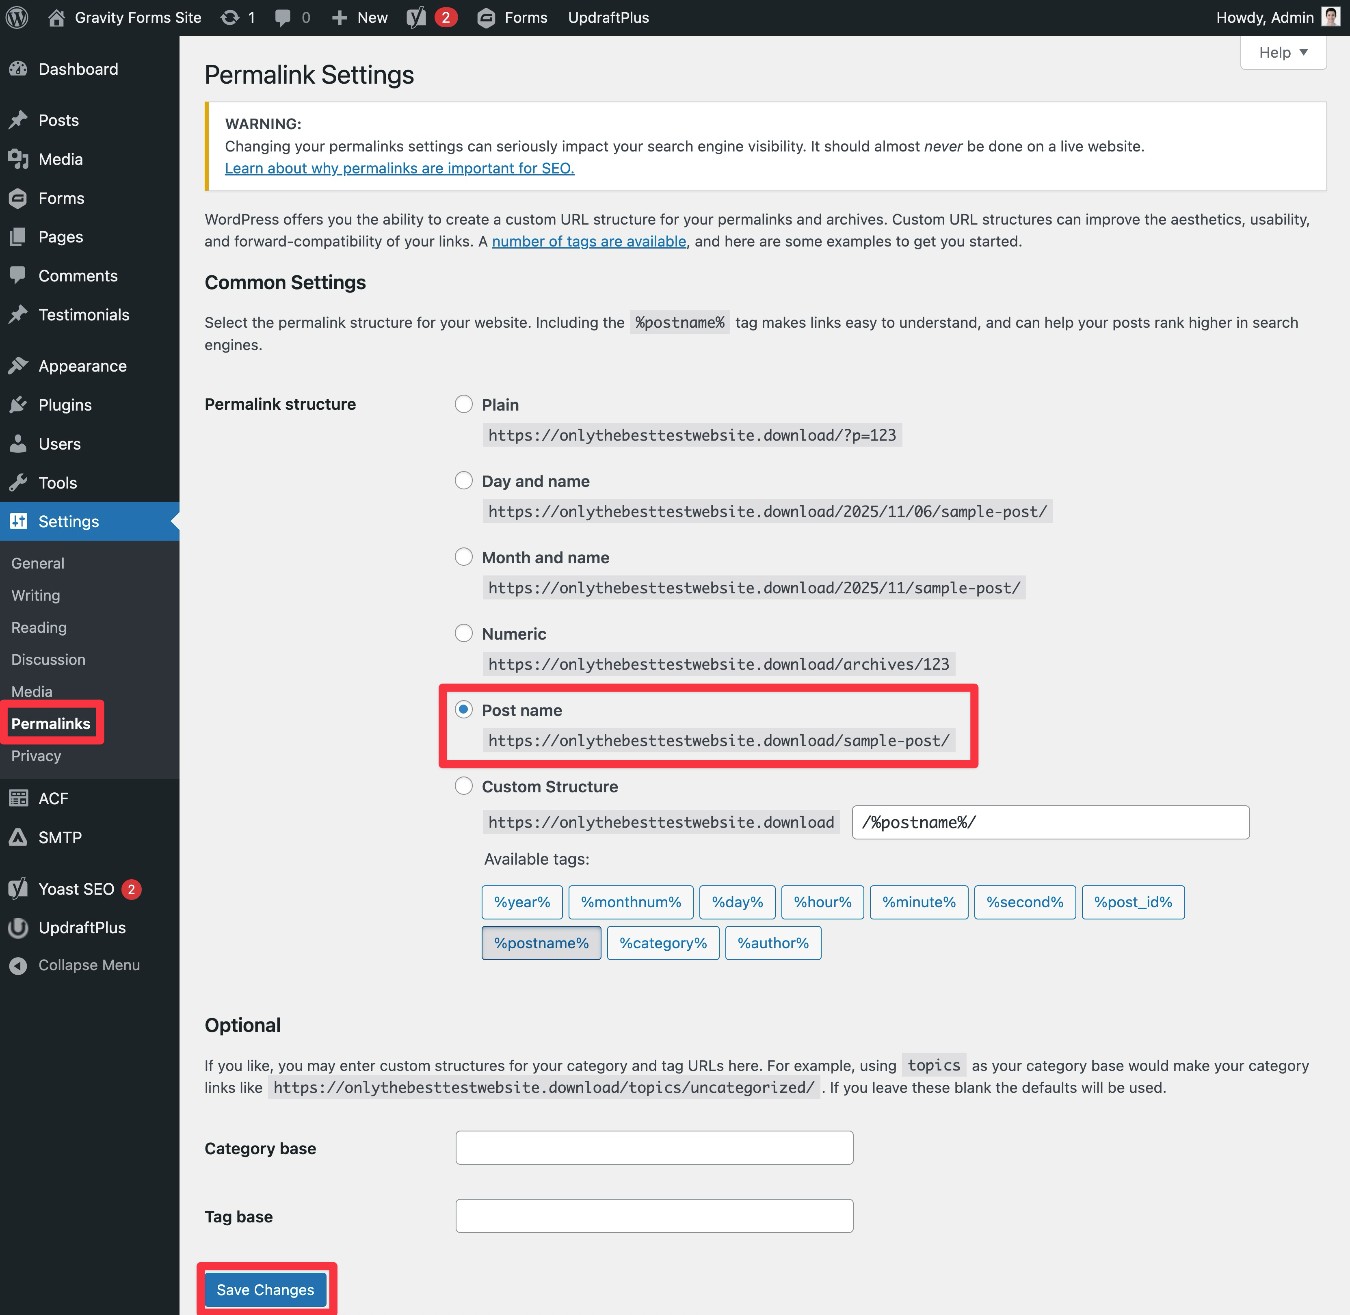
To change your site’s permalink structure, you can go to Settings → Permalinks in your WordPress dashboard.
Note – Be careful about changing permalink structure on an established website. You should only change your structure if your site is new and hasn’t built up any traffic/rankings yet.
For the vast majority of WordPress sites, the Post name structure is the best option. It’s the simplest option and only uses each piece of content’s URL slug, which we’ll discuss later in this post.
Submit your WordPress site to Google Search Console (and Bing Webmaster Tools)
Google Search Console is a 100% free service for webmasters that comes directly from Google.
If you verify your site with Google Search Console, you can access a number of helpful tools, along with search performance data that comes directly from Google (including keyword rankings and search clicks).
Verify your site with Google Search Console
Before you can start using Search Console, you’ll need to verify your site with Google. Essentially, this proves to Google that you control your WordPress site.
Thankfully, the Yoast SEO plugin can help you do this, and you can use your existing Google account for everything.
You can read this article for a full tutorial, but here’s a quick guide on how to verify your site with Google Search Console:
- Open the Google Search Console website. If you already have a Google account and are logged in, you can get started right away using your existing Google account. If you don’t have a free Google account yet, you’ll need to create one before continuing.
- Choose the option to add a new “Property”, which is what Google calls your website.
- In the Select property type interface, choose the URL Prefix option and enter the full URL to your WordPress site, including HTTPS and, if applicable, WWW.
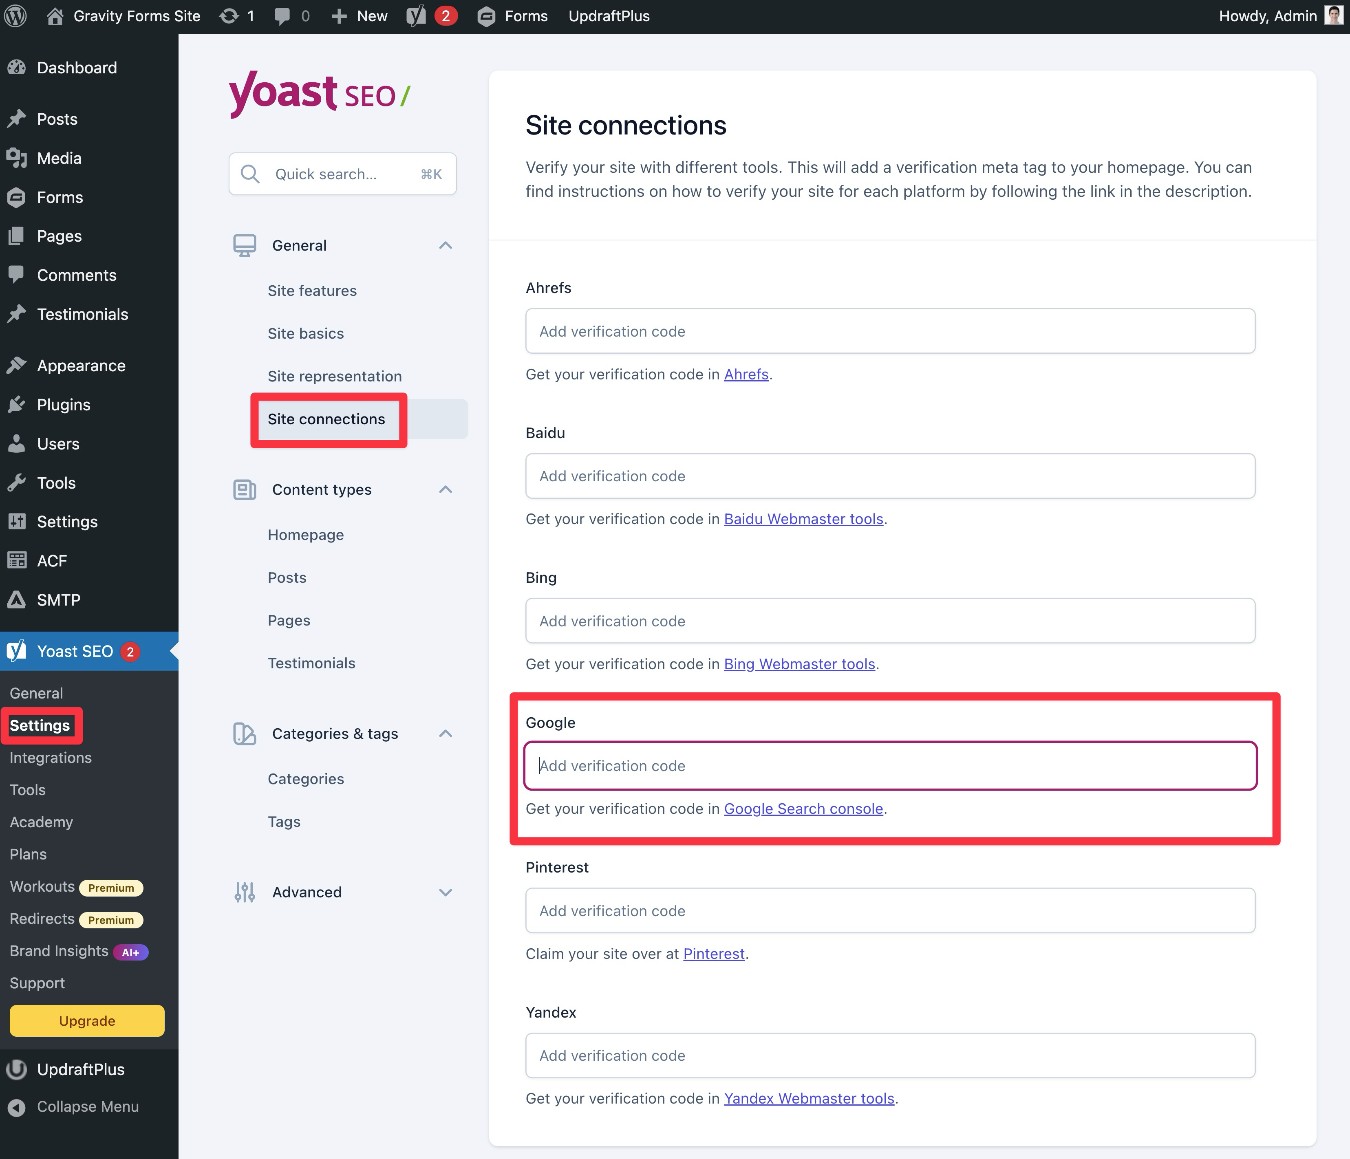
- In the Verify ownership popup, choose the HTML tag option.
- Copy the HTML tag and add it to Yoast SEO (Yoast SEO → Settings → Site connections in your WordPress dashboard).
Submit your sitemap to Google
Once you’ve verified your site with Google Search Console, you should also submit your site’s XML sitemap, which will help Google crawl and understand your site.
WordPress includes a built-in feature to create an XML sitemap, and the Yoast SEO plugin actually replaces this default sitemap with an even more detailed one.
If you’re using Yoast SEO, you can find your site’s XML sitemap by appending /sitemap_index.xml to the end of your domain name. For example, the sitemap for the Gravity Forms website is located at https://www.gravityforms.com//sitemap_index.xml.
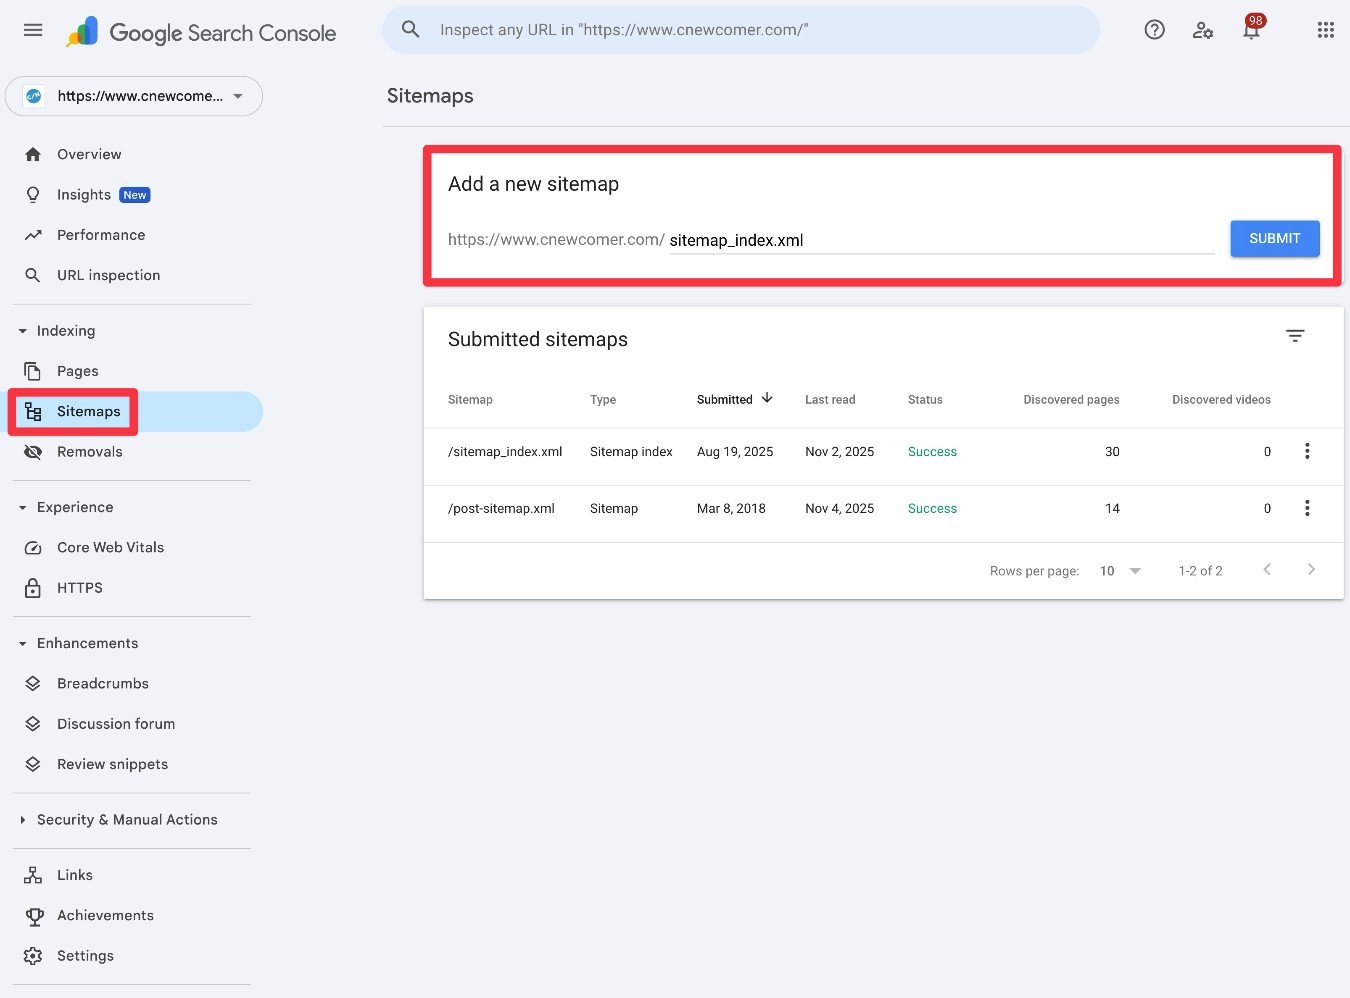
Once you’ve located the URL of your website’s sitemap, here’s how to submit it to Google Search Console:
- Open the Google Search Console dashboard.
- Go to the Sitemaps tab.
- Enter the URL to your prefix in the Add a new sitemap box.
- Click Submit.
Verify with Bing Webmaster Tools
Bing Webmaster Tools is essentially Microsoft’s version of Google Search Console for the Bing search engine.
While Bing isn’t anywhere near as popular as Google, it is still worth taking the time to verify your site with Bing Webmaster Tools and submit your sitemap there, as well.
Yoast SEO also has a guide on how to add your site to Bing Webmaster Tools.
How to optimize individual pieces of content
Once you’ve set up your SEO plugin, chosen an optimized permalink structure, and submitted your site to Google Search Console, most other SEO tasks involve optimizing the individual pieces of content that you publish on your site, such as your blog posts and pages.
While this will add a little extra work to your content publishing workflows, investing this time is more than worth it because it will give you a chance to significantly increase your visibility in search engines like Google.
Find relevant keywords for your content
If you want to get the best return on investment from your content creation efforts, you should optimize your content for search terms that are:
- Popular with searchers.
- Not unrealistically competitive, as your site might struggle to rank for super competitive keywords.
To find these keywords, it can be useful to use a keyword research tool.
You can find some free keyword research tools, but they’re usually limited in the suggestions that they can provide. KeySearch is a good affordable option in terms of premium tools, with KWFinder being another one to consider.
If you’re willing to pay a bit more, the industry-leading tools are Ahrefs and SEMrush, though both can get a bit pricey.
Here are some good introductory guides to keyword research:
Once you’ve found some relevant keywords, you should also try to optimize your content for those keywords, without negatively affecting the human reading experience.
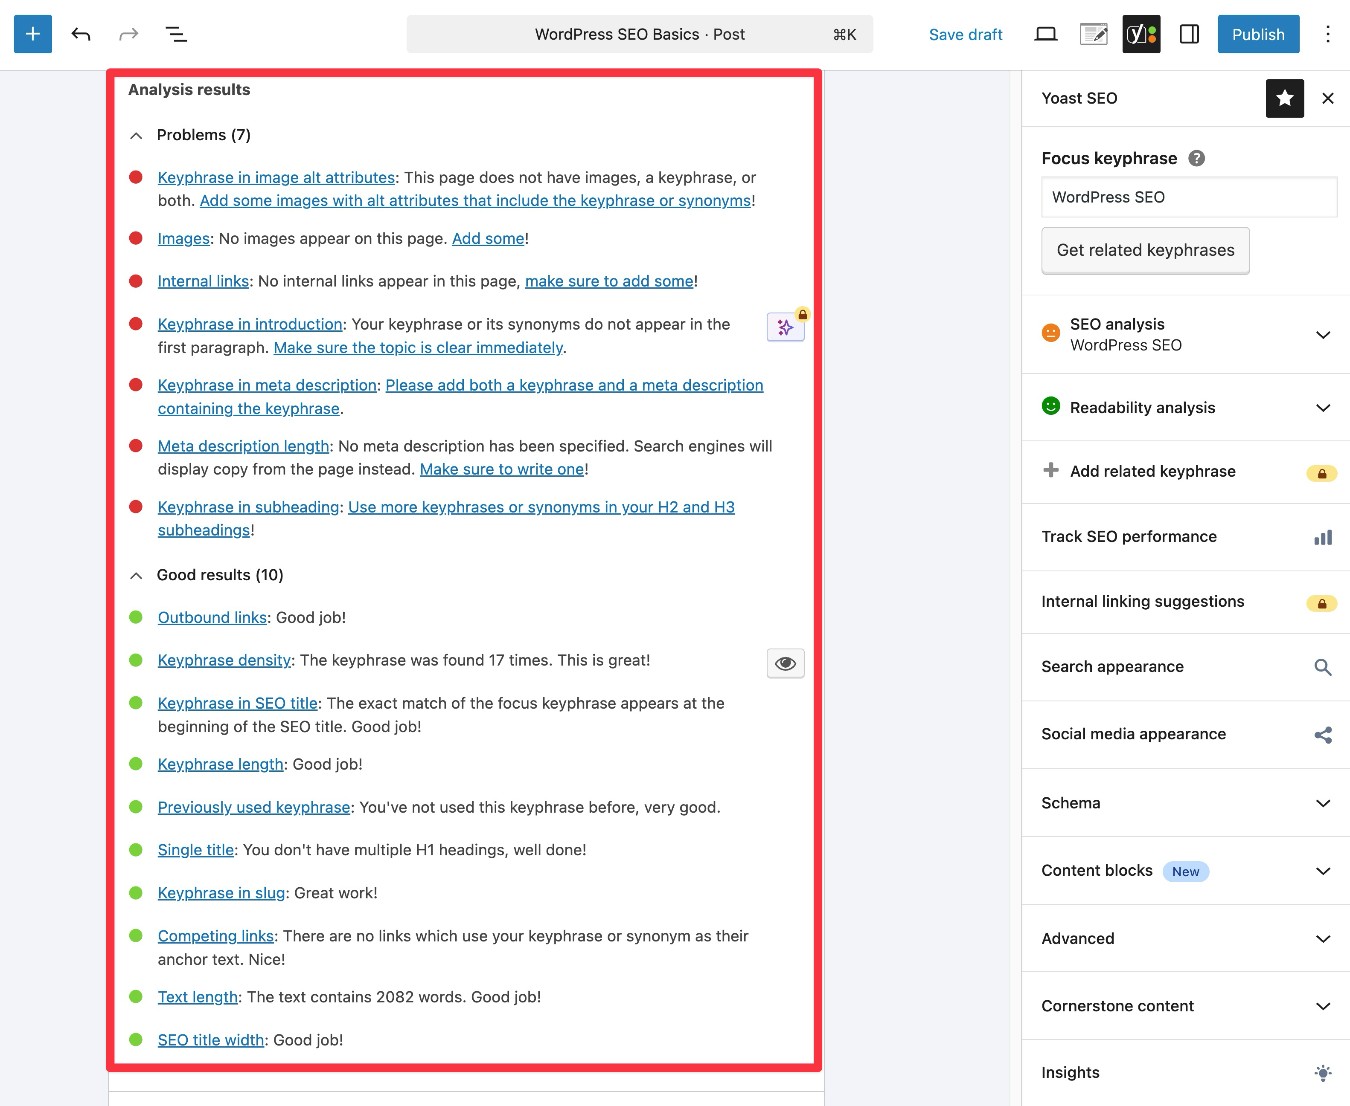
If you’re using Yoast SEO, it includes a built-in feature to help you see whether you’re effectively optimizing your content for your primary keyword. You can add a Focus keyphrase using the option in the sidebar or the box below the editor.
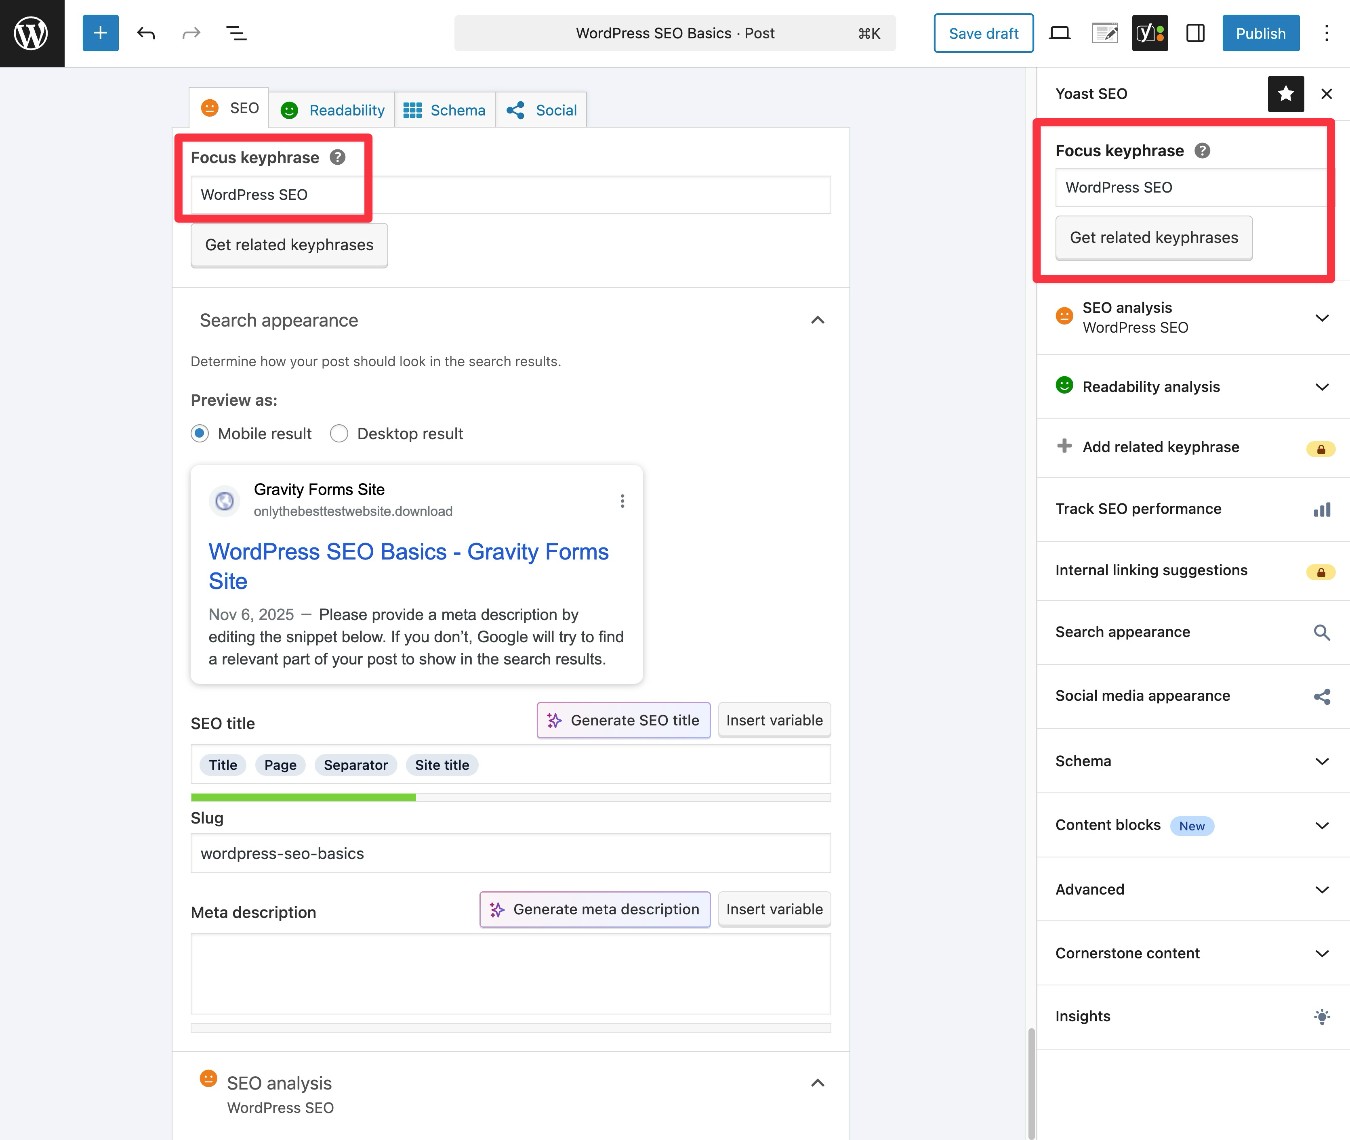
Once you enter your main keyword in the box, it will give you an overall rating, along with a list of suggestions for how you could improve your content’s SEO.
Optimize basic metadata (SEO title, meta description, and URL slug)
Your content’s SEO title, meta description, and URL slug give you a chance to control how your site looks in Google search results*.

These details are important for both search engines and humans:
- Search engines – These details give you a chance to optimize your content for your main focus keyword. If possible, you should try to naturally include your focus keyword in these areas.
- Humans – People who are searching in Google will see these details. Creating a quality SEO title and meta description might convince people to click on your site over other sites ranking for that keyword.
When you’re creating your SEO title, meta description, and URL slug, you should always write for humans first. If possible within that context, you should also try to include the primary keyword(s) for which you’re trying to rank the content.
To set your SEO title and meta description with Yoast SEO, you can click the Yoast SEO icon and choose Search appearance in the sidebar. Or, you can use the metabox below the editor.
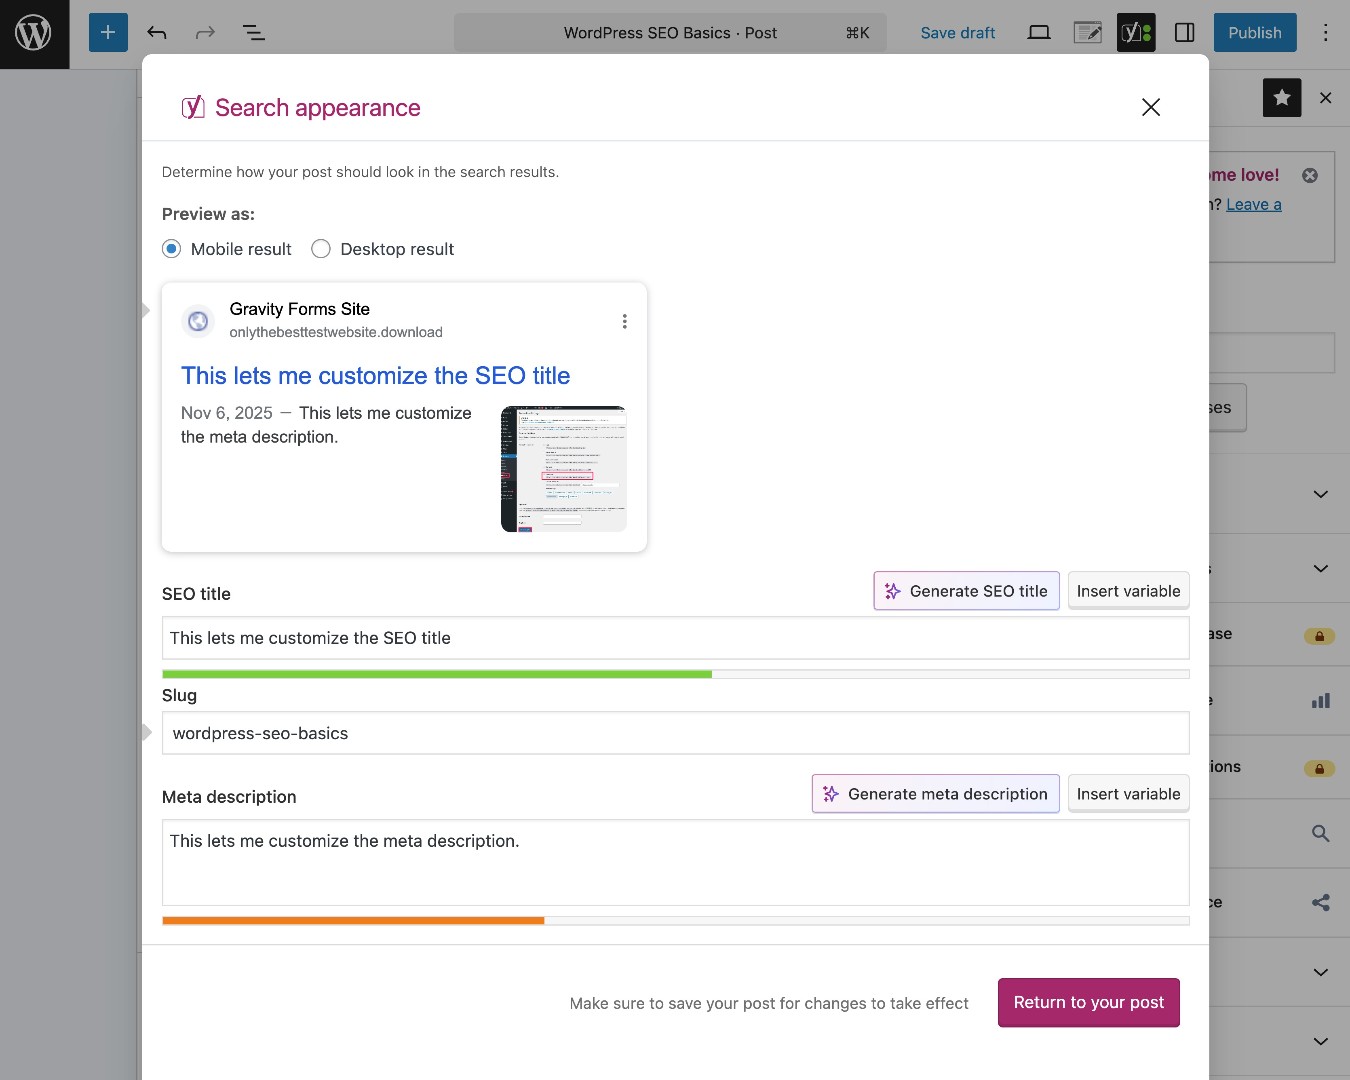
You’ll also see a live preview of what your site might look like in Google, which is important because there are word/character limits to how long each piece of content can be.
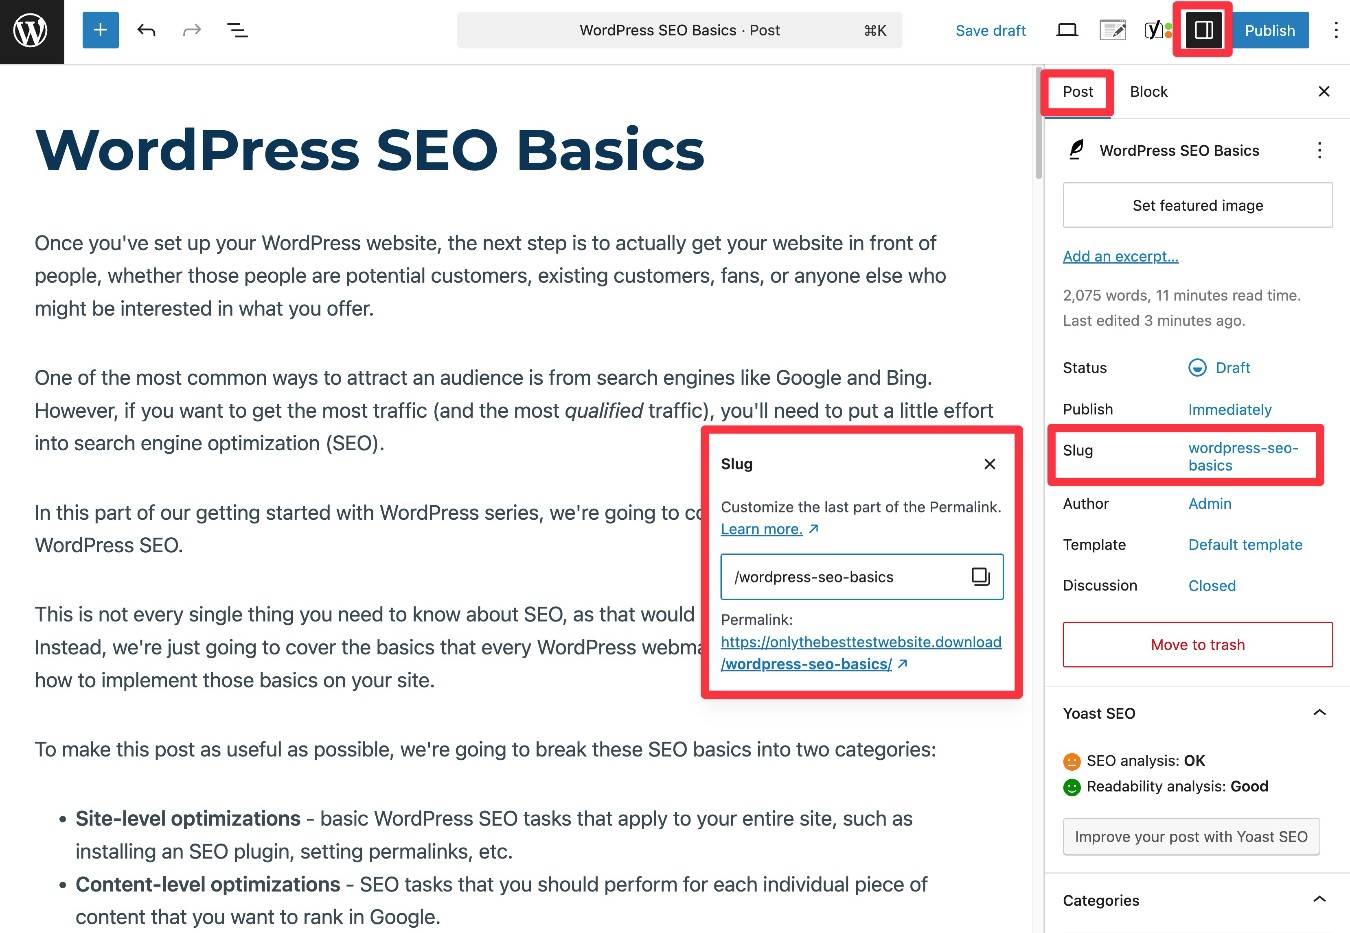
To set the content’s URL slug, you can use the Slug option in the Post tab of the main editor sidebar.
*Note – In some cases, Google will create its own SEO title and meta description, regardless of the text that you created. While this can be frustrating, there’s really no way to prevent it. Because Google usually uses your SEO title and meta description, it’s still definitely worth taking the time to write a unique title and description for each piece of content.
Create structured, readable content (headings, white space, lists, etc.)
Creating structured and readable content is good for both your human visitors and search engines.
Here are some tips for how to create readable content:
- Use headings and subheadings to break up your content – These headings are also a great place to include your focus keyword and related keyword (when you can do so naturally).
- Use bullet lists and numbered lists – Not only do these make it easy for human visitors to scan (like you might be doing right now!), but they can also help Google understand your content for featured snippets and AI summaries.
- Use tables when applicable – Tables are another great way of structuring some content. They serve a similar purpose as lists.
- Avoid walls of text – Try to keep paragraphs short and include plenty of white space.
Optimize the images in your content
Images play another important role in SEO, both in terms of optimizing your content for regular Google search and also giving you a chance to rank your images in Google Image Search, which can also attract people to your site.
Before you upload images to your site, you should try to use descriptive words in the filename, instead of random letters and numbers. For example, if you were uploading a screenshot of the drag-and-drop form builder in Gravity Forms, you might use something like gravity-forms-builder.jpg instead of 12jghgas214kgh.jpg.
Once you’ve uploaded the image and inserted it in your content, you should also add image alt text to every image.
This describes the image in plain text, which can help Google understand the image in more detail and also provides additional context about your post in general.
In addition to its SEO benefits, adding image alt text is an important part of making your website more accessible to human visitors browsing with screen readers or other assistive devices – so it’s a double win.
To add image alt text, select the Image block in the WordPress editor. Then, you can use the Alternative Text box in the sidebar to add your alt text.
Get started with WordPress SEO today
If you want people to be able to find your business in search engines like Google, it’s essential to understand basic WordPress SEO best practices.
While SEO certainly can get complex and potentially expensive, getting the basics right will already give you a great chance to rank in search engines.
At a site level, you’ll want to make sure that you install a quality SEO plugin, choose an optimal permalink structure, and connect your site to Google Search Console.
When you publish individual pieces of content, try to do a little keyword research to focus that post. Then, make sure to create readable content, optimize the metadata, and optimize your images.
To learn more about adding content to your site, you can check out our beginner’s guide to adding WordPress pages.

If you want to keep up-to-date with what’s happening on the blog sign up for the Gravity Forms newsletter!
News
Berita Teknologi
Berita Olahraga
Sports news
sports
Motivation
football prediction
technology
Berita Technologi
Berita Terkini
Tempat Wisata
News Flash
Football
Gaming
Game News
Gamers
Jasa Artikel
Jasa Backlink
Agen234
Agen234
Agen234
Resep
Download Film
Comments are closed, but trackbacks and pingbacks are open.