Trying to add images to your WordPress forms?
With the Gravity Forms plugin, you have multiple options for including images in your forms.
You can include images as options in actual fields, such as letting visitors choose between multiple images with radio buttons/checkboxes or including them in product fields. Or, you can also include images as standalone elements.
In this post, we’re going to go over all the different options for adding images to WordPress forms that you create with Gravity Forms.
We’ll start by focusing on core functionality that’s available in the Gravity Forms plugin on all licenses. Then, we’ll also touch on how you can use add-ons to gain even more flexibility, if needed.
Example use cases for adding images to forms
There are a lot of different reasons that you might want to add images to your forms:
- User experience – images can create a better and more engaging experience for people filling out your forms.
- Explanations/clarity – images might make it easier for people to understand the different options in your form.
- Ecommerce – if you’re creating payment forms to sell products or services, adding images can help people understand what the product/service they’re looking at is.
- Personalization – images can create a more personalized experience for people filling out the form.
- Branding – images can enhance your branding, even if you’re not using them as part of form fields directly.
These are just a few ideas – you’ll probably have your own reasons for adding images to your forms, as well.
How to add images to forms with core Gravity Forms features
Now, we’ll go over a few different methods for adding images to your WordPress forms using core functionality in Gravity Forms.
Here are the methods that we’ll cover:
- Using the dedicated Image Choice field – Gravity Forms includes a dedicated Image Choice field that allows users to choose from a list of images using different formats such as radio buttons, checkboxes, and more.
- Adding images to other fields using HTML – this works for Product fields, along with a variety of other field types.
- Including standalone images in forms using the HTML field – this lets you add individual images to your form. This is useful if you don’t want to include them as part of another field.
Again, none of the methods in this section require add-ons. You can implement all of these using just the core Gravity Forms plugin, which means that they’ll work with any license.
How to upload image files to WordPress
For all of these methods, we’ll assume that you’ve already uploaded the images that you want to use to your WordPress site’s server.
If you’re not sure how to do that, the easiest way is to upload the image files directly to your WordPress Media Library. Here’s how:
- Open your WordPress dashboard.
- Go to Media → Add Media File.
- Drag one or more image files over the interface to upload them. Or, you can click the Select Files button to manually select them.
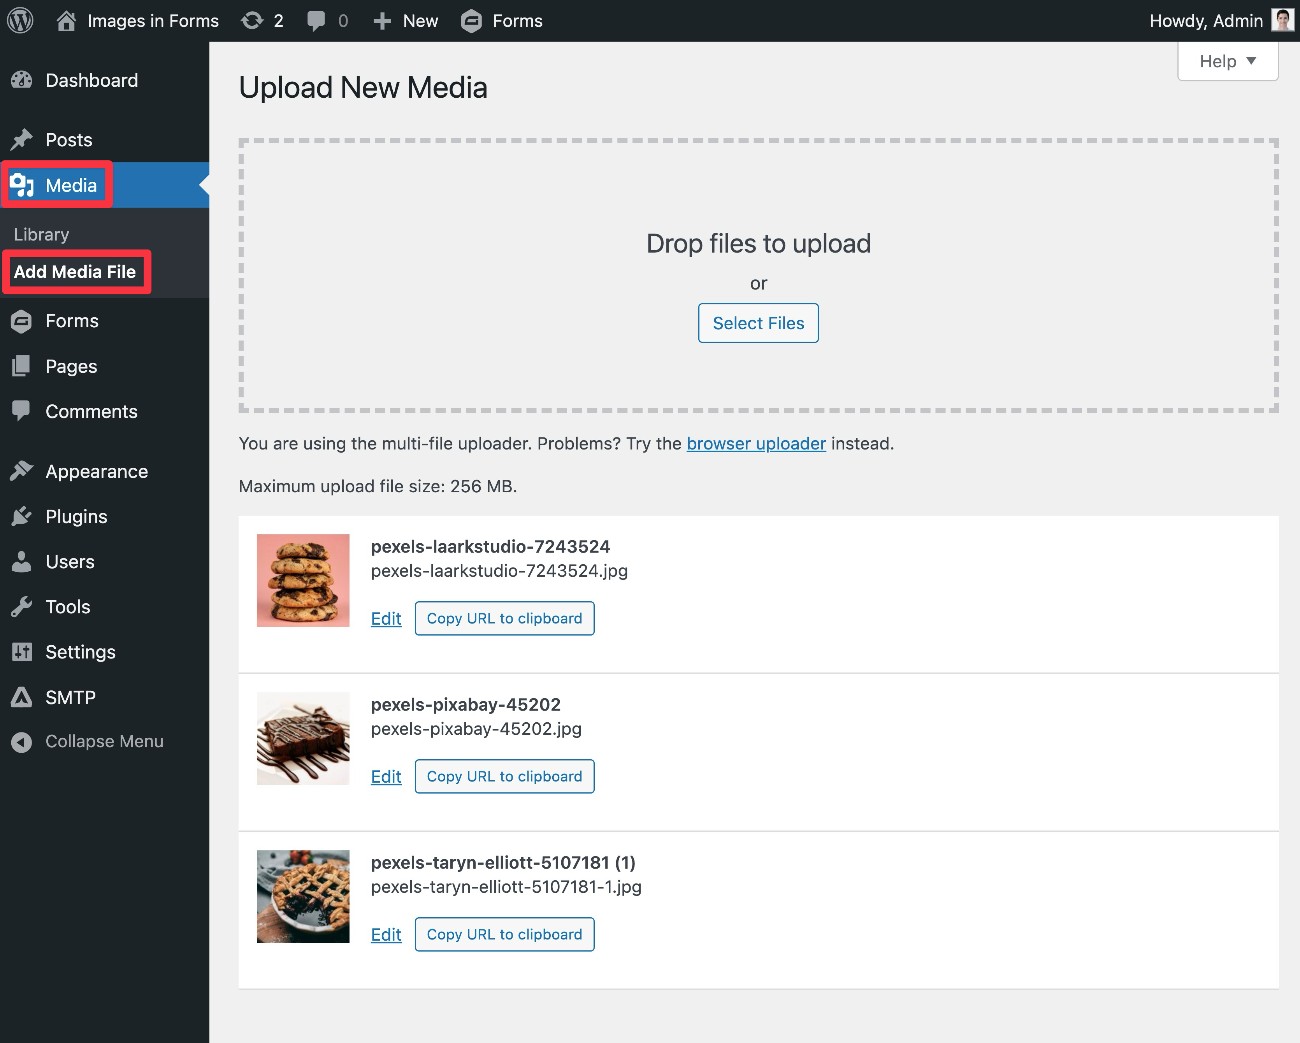
Once you’ve uploaded the files, they should appear in your Media Library (Media → Library).
For some of these uses, you’ll need the direct URL to the image file on your server.
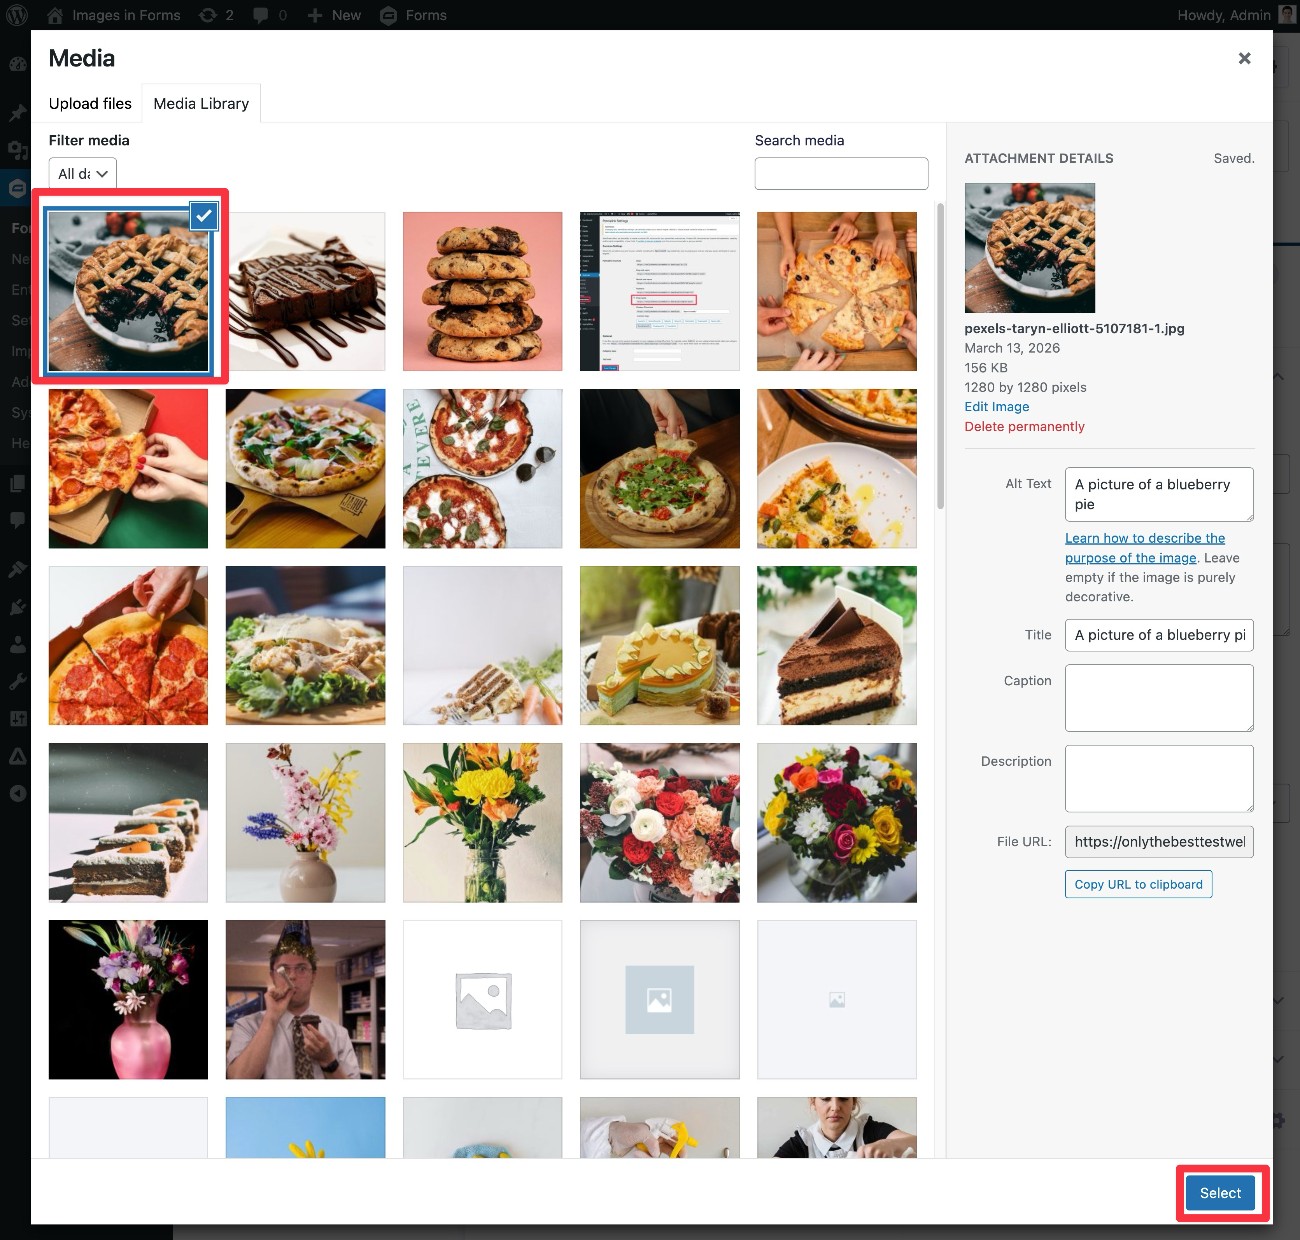
To find this URL, first select the image in your Media Library. This should open an Attachment details popup that includes more information about the image.
You can find the URL in the File URL box. You can also click the Copy URL to clipboard button to copy the image file URL.

Now, let’s get into how to add those images to your WordPress forms…
Image Choice field
If you want to let users choose between multiple images, Gravity Forms includes a dedicated Image Choice field, which is located in the Standard Fields section.
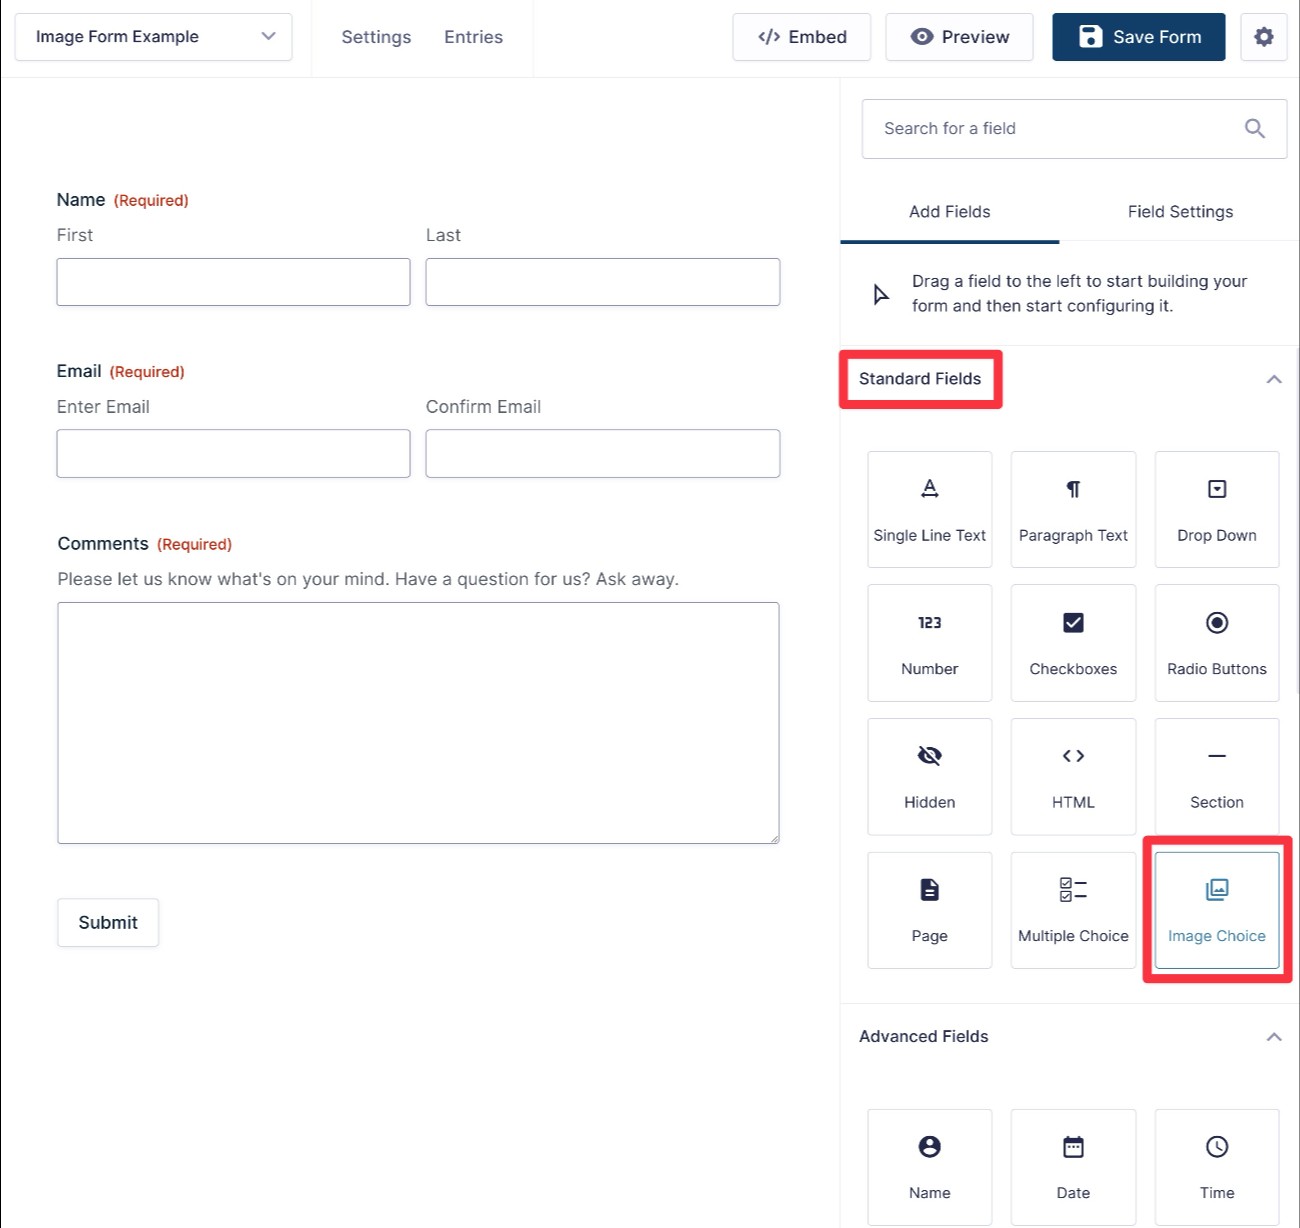
The field includes multiple options depending on how many images you want people to be able to select:
- Select One – visitors can select a single option (similar to radio buttons).
- Select Multiple – visitors can select as many options as they want (similar to checkboxes).
- Select Exact Number – visitors must select the exact number of options that you specify (e.g. “Select three options”).
- Select Range – visitors can choose between a specified range (e.g. “Choose between one to three options”).
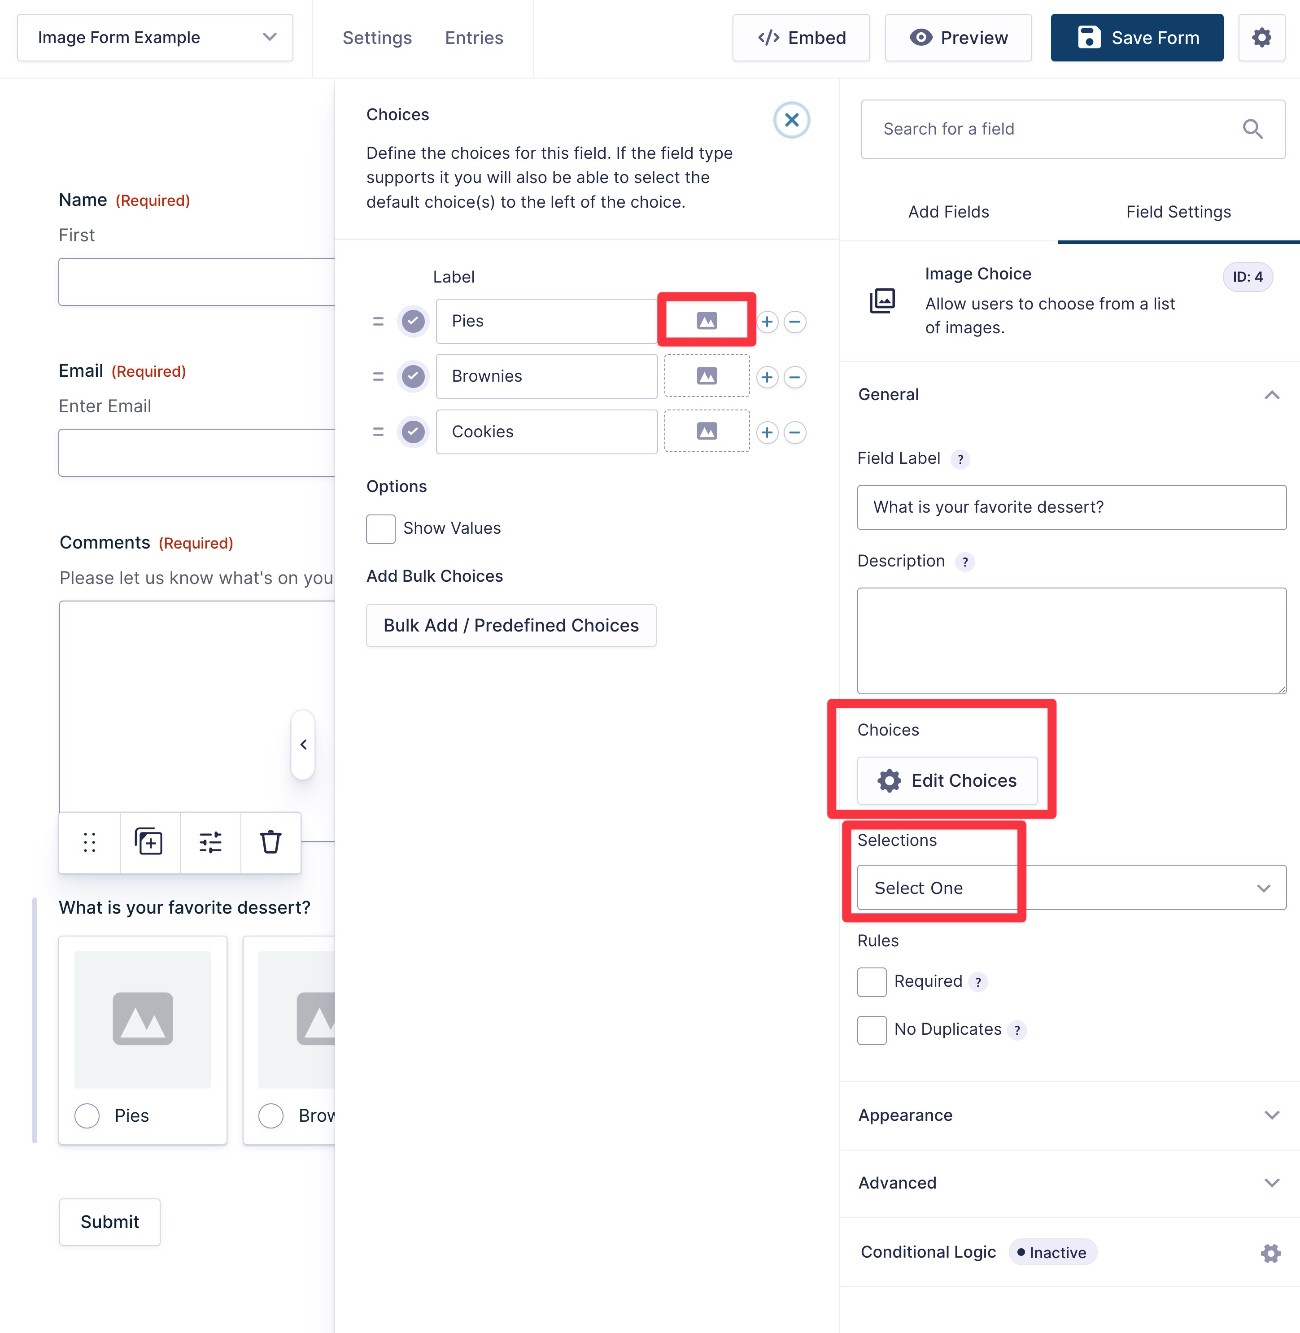
When you add the Image Choice field, you can first use the Selections drop-down to control how visitors can choose options.
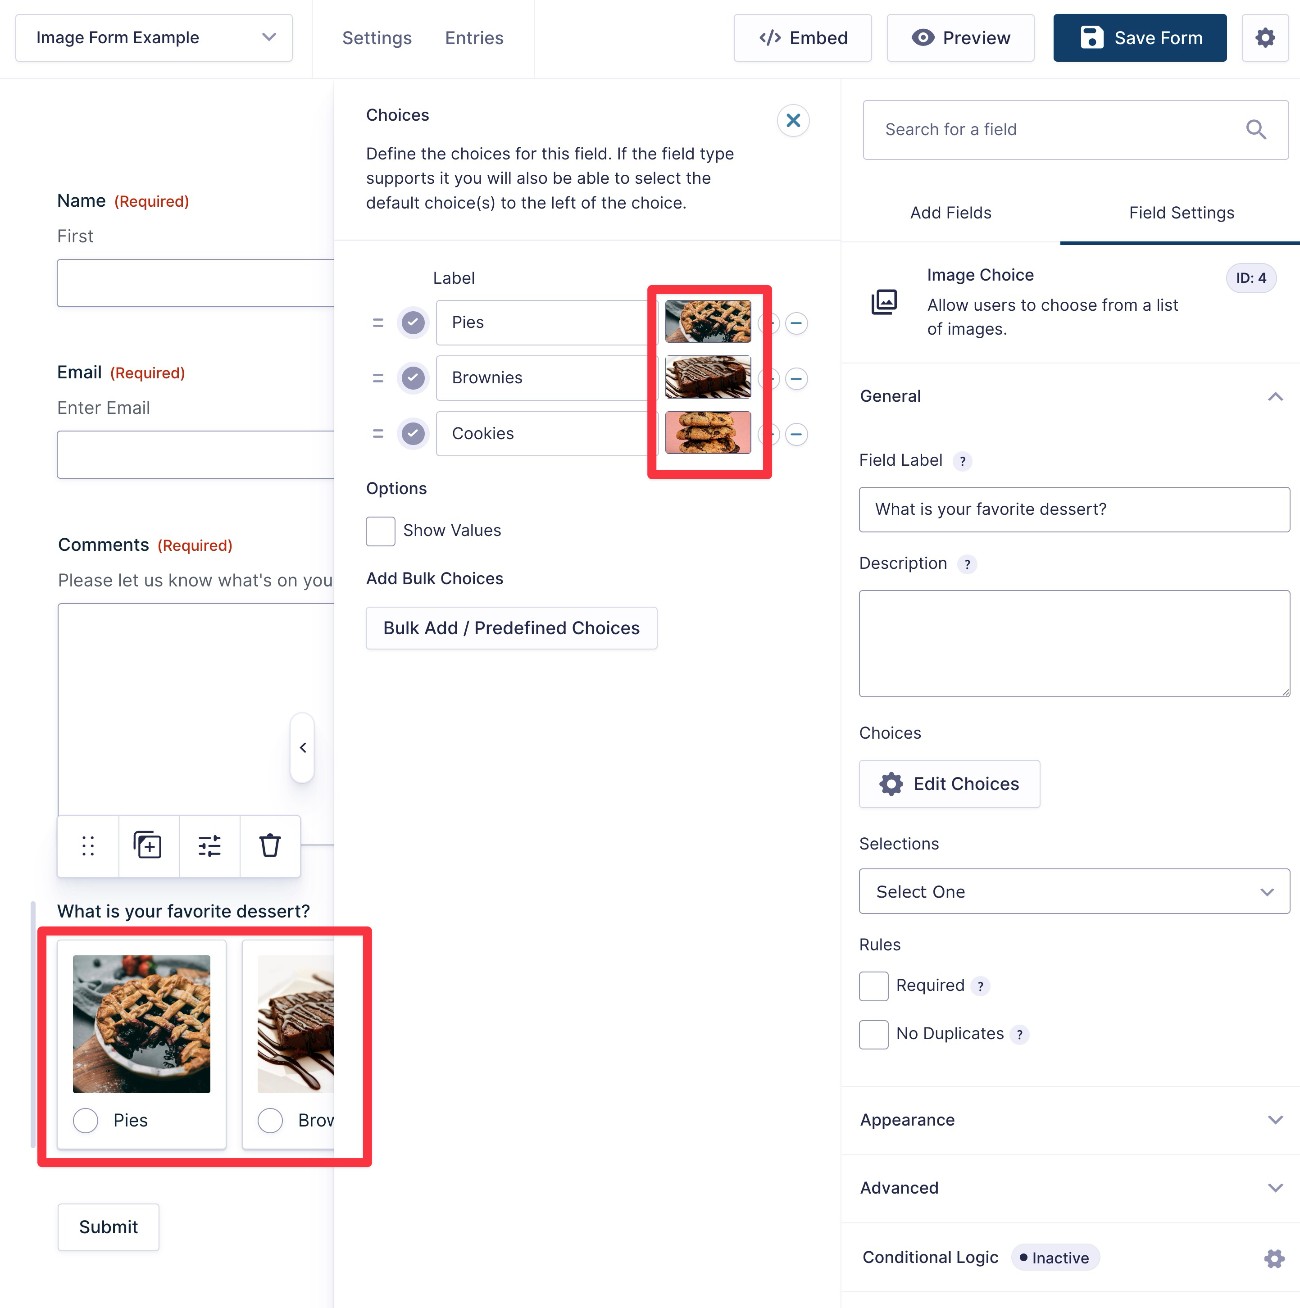
Then, you can click the Edit Choices button to control which choices are available and add images.
To add an image, click the image icon in the list of choices.
You can then choose an existing image from your WordPress Media Library or upload a new image. We also recommend adding alt text to make the image more accessible.
Repeat the process to add as many choices/images as needed.
As you add images, they should automatically appear in the live preview of the field.
As with choices in other Gravity Forms fields, you can also assign a value to each choice by checking the Show Values box. This can be useful if you want to include a visitor’s choices in calculations.
And that’s it for the Image Choice field! In the next section, we’ll discuss some options for how to easily style the images.
How to style the Gravity Forms Image Choice field
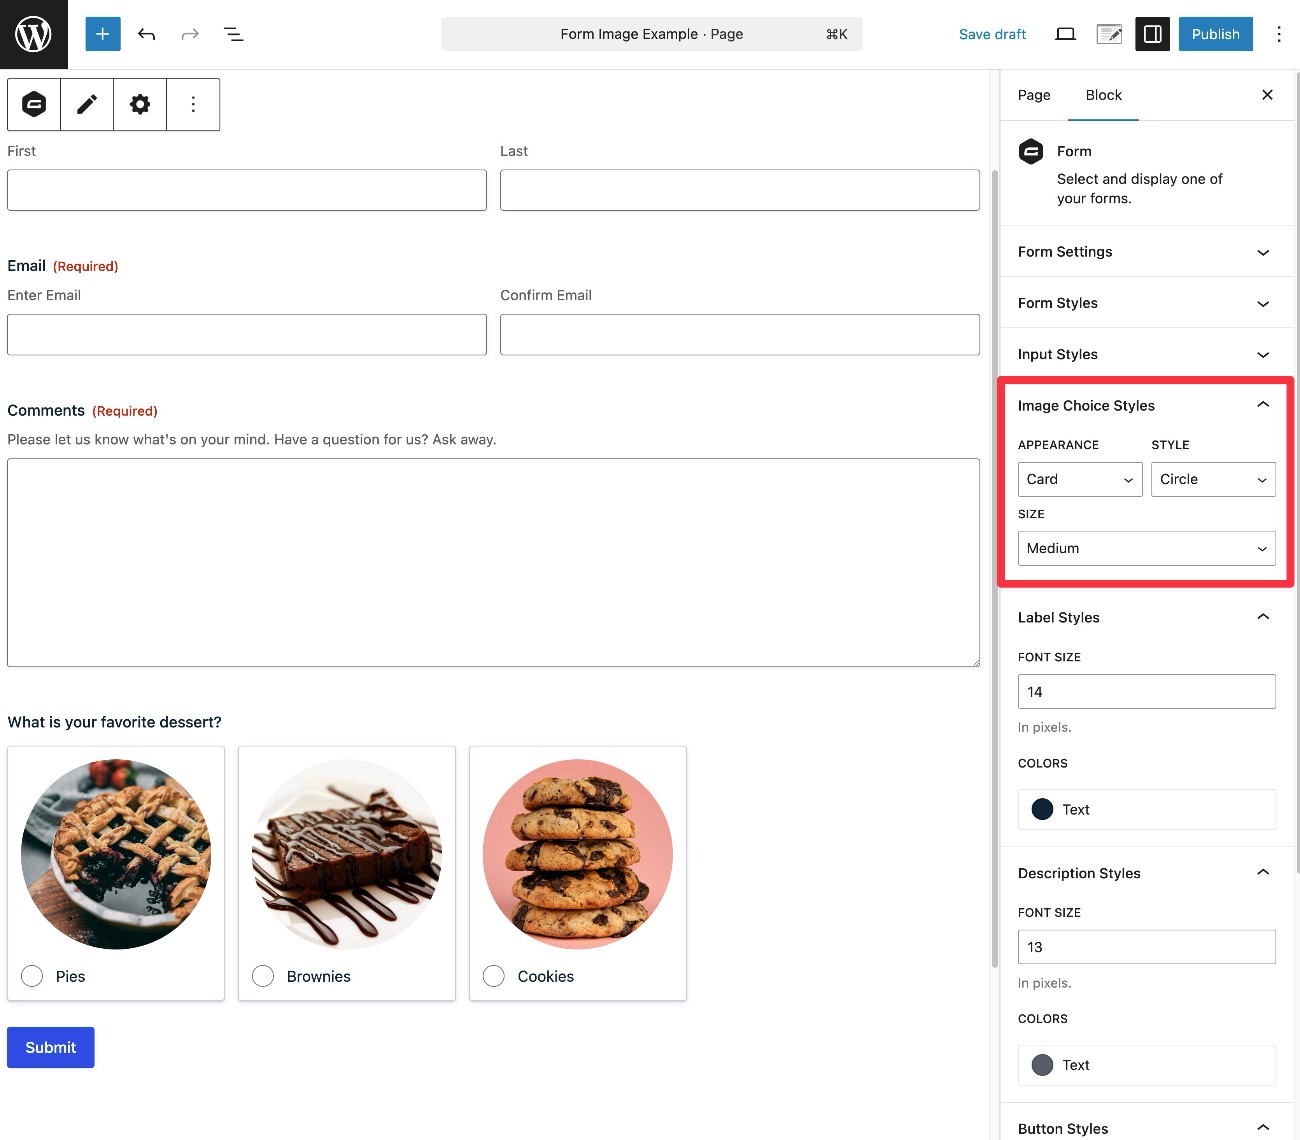
If you’re using the Orbital form theme, you can style images directly from the WordPress block editor.
In the Image Choice Styles settings, you get the following option:
- Appearance – choose between a Card and No Card layout.
- Style – choose between Square or Circle images.
- Size – choose between Small, Medium, or Large image sizes.
For example, in the screenshot below, you can see that we’ve changed the image style to circles instead of squares.
Adding images to other fields (including Product fields)
In addition to the dedicated Image Choice field, you can also add images to other field types by using some simple HTML.
This works great for Product and Options fields, though you can use this same basic approach for other field types, as well. This includes other specialized fields such as the Survey field.
For this tutorial, we’ll focus on adding images to the Product field, as this is a common use case. However, the same basic steps will work for other field types, too.
Upload your image to your server
To start, you’ll need to upload the image to your site’s server, if you haven’t done so already.
For this use case, we recommend resizing the images prior to uploading them to your server, as this will make it easier to control the layout of your form.
The easiest way to upload images is via the WordPress Media Library, as we showed you above.
Once you upload the file, you’ll also need the direct link to the image file on your server. We also covered how to locate this link in the previous section.
Set up some simple HTML
Now, you need to set up some simple HTML for the image(s) that you want to use.
The basic HTML that you need is this:
<img src=" alt="Describe the image">
Here’s how to fill it out:
- src – paste the full link to your image file inside the quotation marks.
- alt – describe the content of the image in plain text. While this isn’t required to insert the image, it is an important part of making your website accessible.
For example, let’s say you want to use these details:
- Image file –
- Alt text – A chicken pesto sandwich on sourdough bread
The full image HTML would look like this:
<img src="" alt="A chicken pesto sandwich on sourdough bread">
Add image HTML to the field
Once you have the HTML for your image, all you need to do is add it to the label of the field.
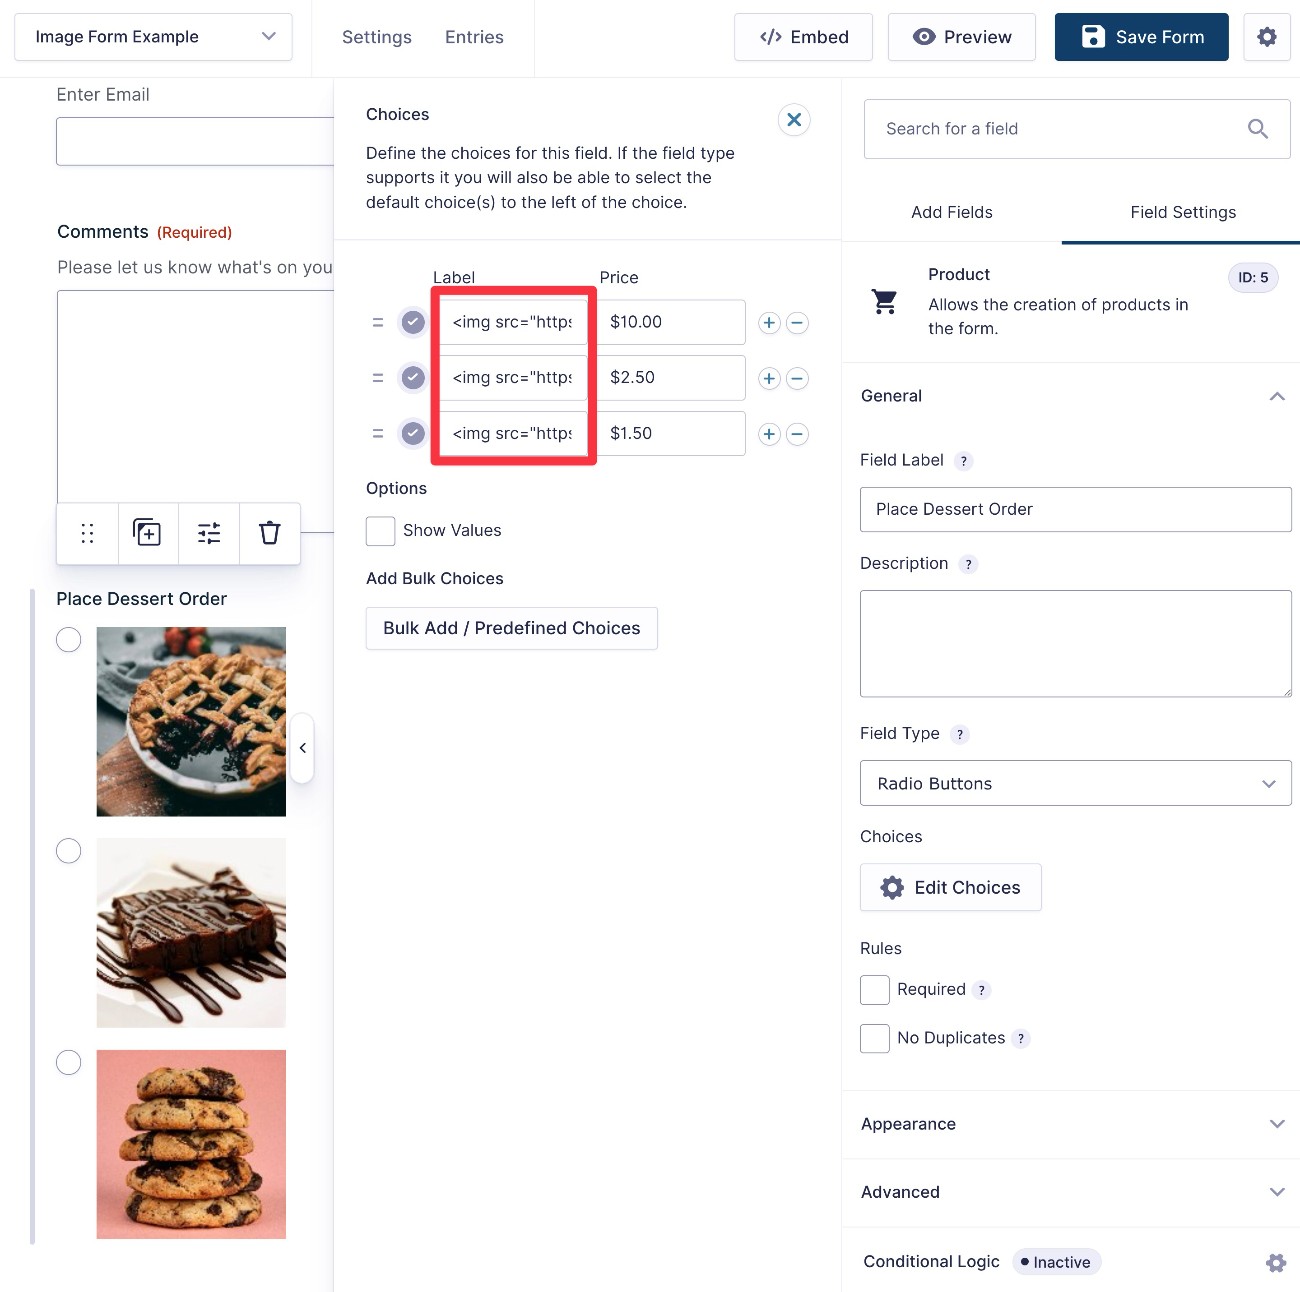
Let’s look at an example of a Product field, though the same basic principle applies to other field types.
If you have a Product field with Radio Buttons, you would click Edit Choices and then add the HTML of each image to the relevant Label for each option.
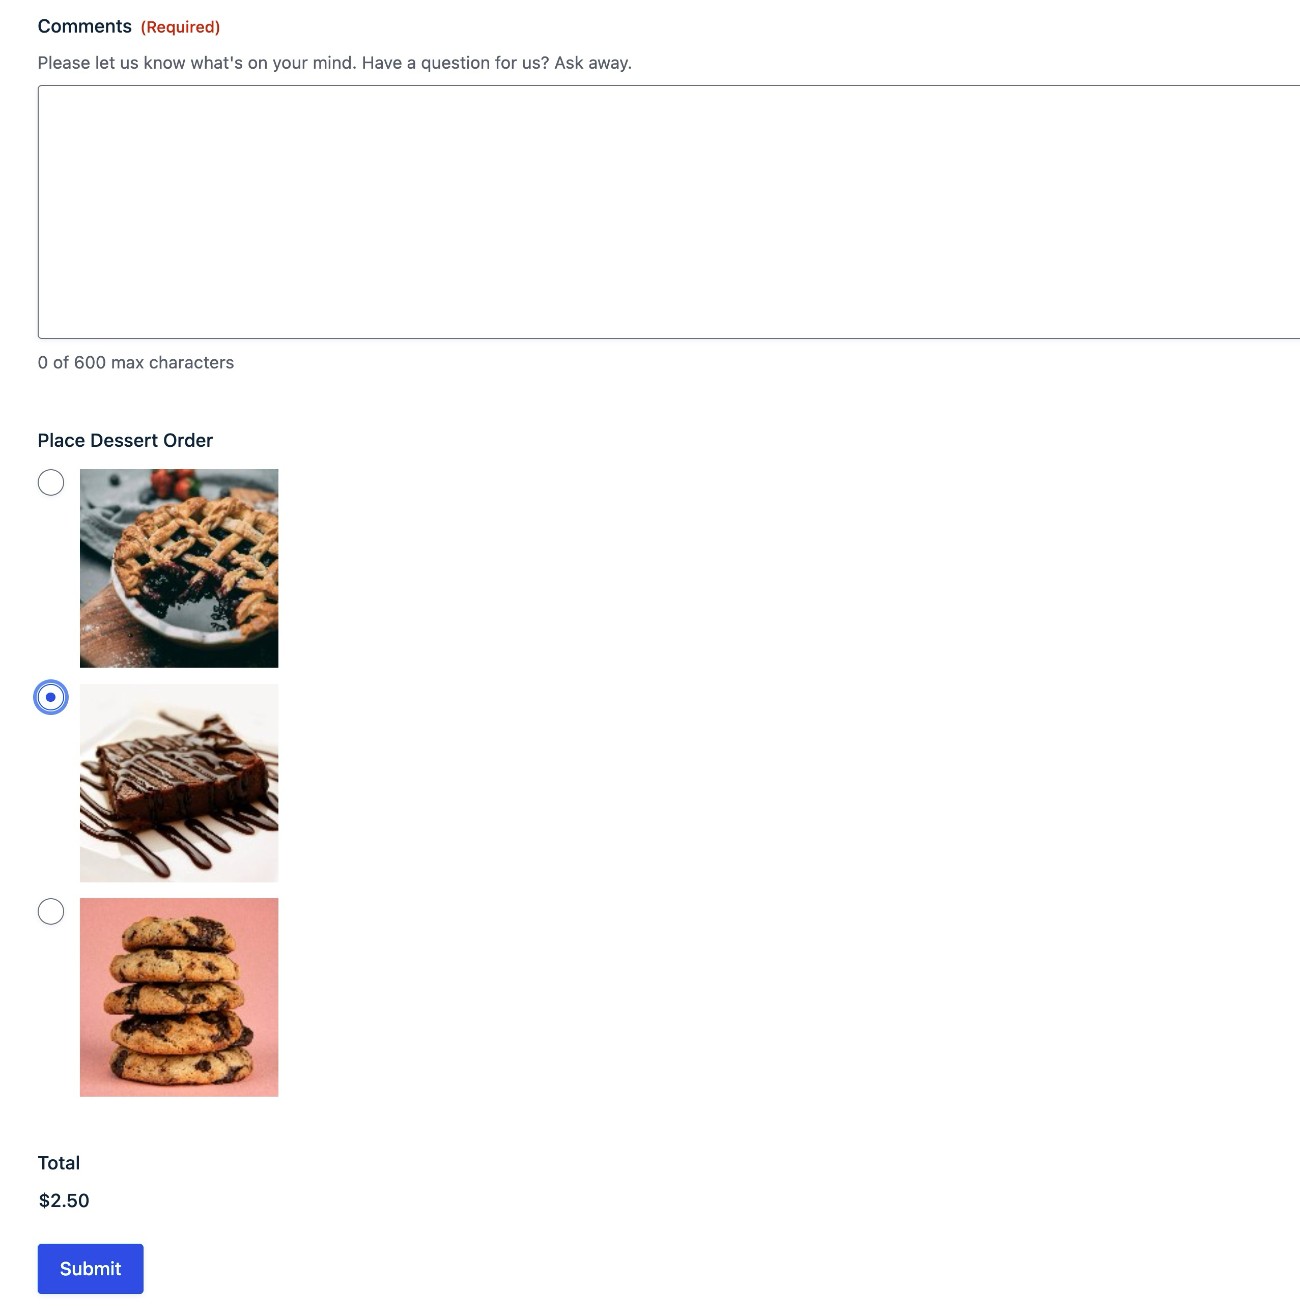
Here’s what that looks like on the frontend:
To adjust the layout of images, such as displaying them in a multi-column layout, you can add CSS ready classes. We have a blog post covering CSS ready classes or you can read the full documentation.
Including standalone images with an HTML field
So far, we’ve focused on adding images to fields that visitors will interact directly with.
However, you also might want to include standalone images in your forms. This could be useful for design, branding, usability, or other use cases beyond helping visitors choose the right option.
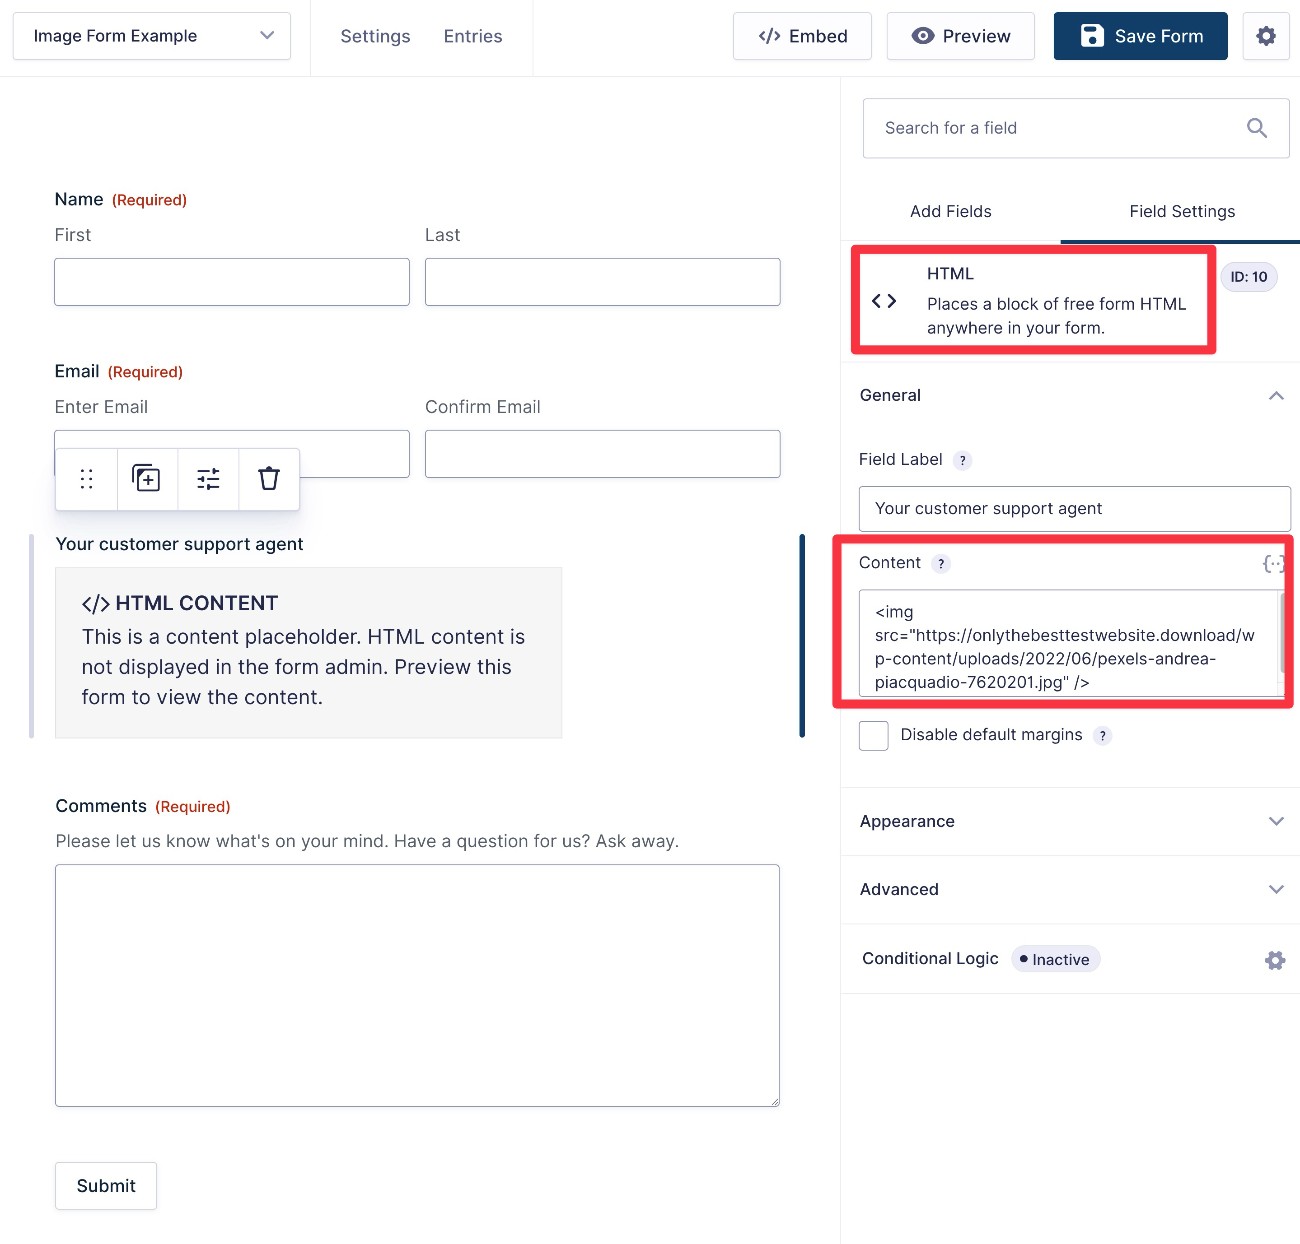
To achieve this, add the HTML field where you want the image to appear.
Then, edit the block and add the image HTML to the Content.
Note – you will not see the images appear inside the backend editor. You need to click the Preview button in the top-right corner to see what the images will look like on your live form.
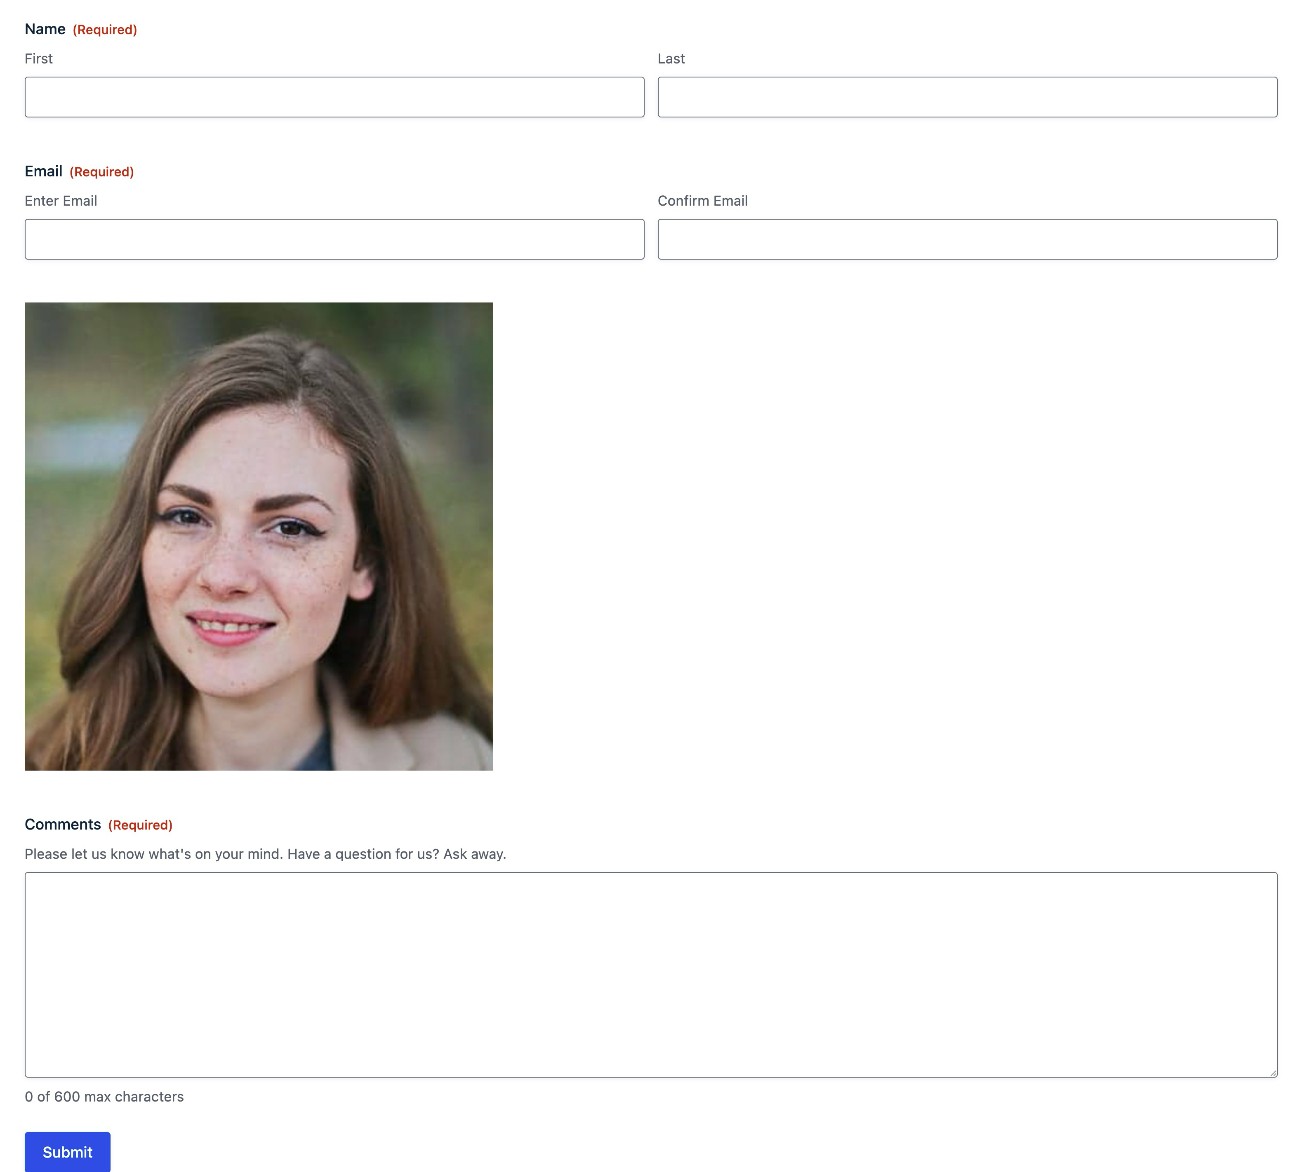
Here’s what that looks like on the frontend – the image is not part of any field. Instead, it’s just a visual element that’s included as part of the form.
How to add images to forms with Gravity Forms add-ons
In addition to using the core functionality of Gravity Forms to include images, there are also a number of third-party community add-ons that can give you even more flexibility for adding images to your forms.
One popular option is the Gravity Forms Image Choices add-on from JetSloth, a Gravity Forms Certified Developer. This means that, while the add-on comes from a third-party developer, its quality has still been certified by the Gravity Forms team.
The add-on adds image support to radio button and checkbox fields throughout Gravity Forms.
In addition to supporting the basic field types, it also supports advanced fields including Survey, Poll, Quiz, Product, and Options fields.

You can also find other community add-ons to help you add images to your form. If the add-on does not come from a Gravity Forms Certified Developer, we encourage you to read reviews and perform your own due diligence before installing it.
Try adding images to your next form
With Gravity Forms, you have multiple options for how to add images to your WordPress forms.
If you want to let visitors choose between multiple options that include images, the dedicated Image Choice field offers the simplest way to get started.
It lets you add images directly to the field and choose from different select options, including radio buttons, multiple choice checkboxes, exact choice checkboxes, and select range checkboxes. You can also easily style the images directly from the block editor.
You can also include images in other fields by adding the image HTML embed directly to the field label. This works great for Product and Options fields, as well as letting you add images to other field types.
Or, you can also add standalone images to your forms using the HTML field.
Finally, if you want even more flexibility than the options in the core Gravity Forms plugin, you can also find third-party add-ons that help you include images in your forms. One great option is the Gravity Forms Image Choices add-on from JetSloth, a Certified Developer.
If you’re already holding a Gravity Forms license, try these methods today to start adding images to your forms.
If you’re not using Gravity Forms yet, purchase a license today to get started on your own website or you can create a free, fully functioning demo website to try all of this functionality before making your purchase.

If you want to keep up-to-date with what’s happening on the blog sign up for the Gravity Forms newsletter!
“*” indicates required fields
PakarPBN
A Private Blog Network (PBN) is a collection of websites that are controlled by a single individual or organization and used primarily to build backlinks to a “money site” in order to influence its ranking in search engines such as Google. The core idea behind a PBN is based on the importance of backlinks in Google’s ranking algorithm. Since Google views backlinks as signals of authority and trust, some website owners attempt to artificially create these signals through a controlled network of sites.
In a typical PBN setup, the owner acquires expired or aged domains that already have existing authority, backlinks, and history. These domains are rebuilt with new content and hosted separately, often using different IP addresses, hosting providers, themes, and ownership details to make them appear unrelated. Within the content published on these sites, links are strategically placed that point to the main website the owner wants to rank higher. By doing this, the owner attempts to pass link equity (also known as “link juice”) from the PBN sites to the target website.
The purpose of a PBN is to give the impression that the target website is naturally earning links from multiple independent sources. If done effectively, this can temporarily improve keyword rankings, increase organic visibility, and drive more traffic from search results.
Comments are closed, but trackbacks and pingbacks are open.